The Five Components of Technical Quality
GreatBirdPic’s Quality Self-Assessment Rubric (QSAR) for Bird Photographs includes three Image Characteristics (Technical Quality, Content, and Artistic Quality) and a set of rules for GreatBirdPics.com and photo contests. This section covers Technical Quality: if you would like to go to one of the other Image Characteristics use the QSAR pull-down menu above (it is recommended you download the rubric to use as a guide from the QSAR Menu item above).
Technical Quality is the first and most important of the Image Characteristics and is broken down into five Components: Focus, Exposure, Lighting, Color Contrast, and Technical Flaws. We will define each of these Components, explain the Levels of Quality for each, and show how each Level Of Quality tracks to one or more of the Four Types of Bird Photograph. Bird photographs from GreatBirdPics.com are used to illustrate each point. Unless otherwise noted, all bird photographs were taken by Mike Warner.
We start with Focus. To jump to one of the other Components of Technical Quality click on one below:
Exposure
Lighting
Color Contrast
Technical Flaws
1. Focus
Focus is perhaps the most important Component of QSAR – if the photographer can’t obtain focus on the bird then the overall image quality will be very low. There are many factors that can influence the focus of an image: a branch or leaf may have been captured by the camera’s Autofocus instead of the bird; the depth of field (determined by the aperture) may be so narrow only a portion of the bird in focus; any movement of the bird or if the camera was not held still when the shutter was depressed will cause the image to be blurred (not technically a focus issue the but the result is similar). Below is the FocusComponent of the QSAR:
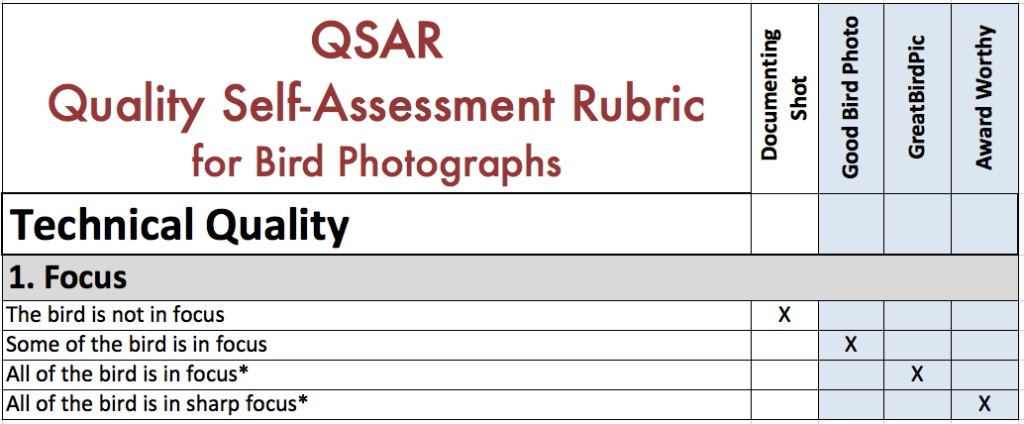
As you can see Focus contains four Levels of Quality, which are each defined and illustrated below. Before we begin, a word about the asterisks (*) on some of the Levels of Quality. Whenever there is an asterisk at the end of a Level of Quality it means that the photograph may also be placed in another of the Four Types of Bird Photograph other than the one indicated on the chart. For example the last Level of Quality is, “All of the bird is in sharp focus* “. The photographer may decide from an artistic point of view that the image looks better if only the head is in sharp focus. The asterisk means that even though the image doesn’t fit that criteria exactly it can still be considered an Award Worthy bird photograph.
Let’s look now at the four Levels of Quality for Focus:
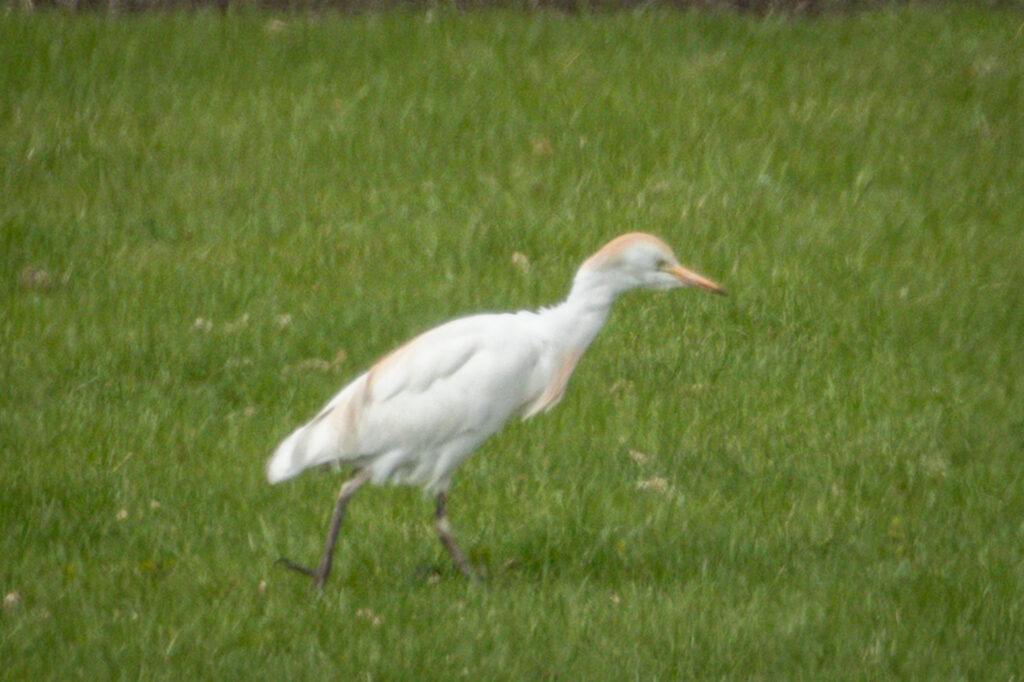
The bird is not in focus = Documenting Shot
Perhaps a leaf is in focus or the branch the bird is sitting on is in focus but not much of the bird is in focus – obviously not a very good bird picture. Images like this would be classified as a Documenting Shot (one of the Four Types of Bird Photograph identified by the QSAR). In the first example below, I took this picture through my car window of a rare (for this area) Cattle Egret and nothing is in focus. I wanted a Documenting Shot of the bird for my files and eBird.
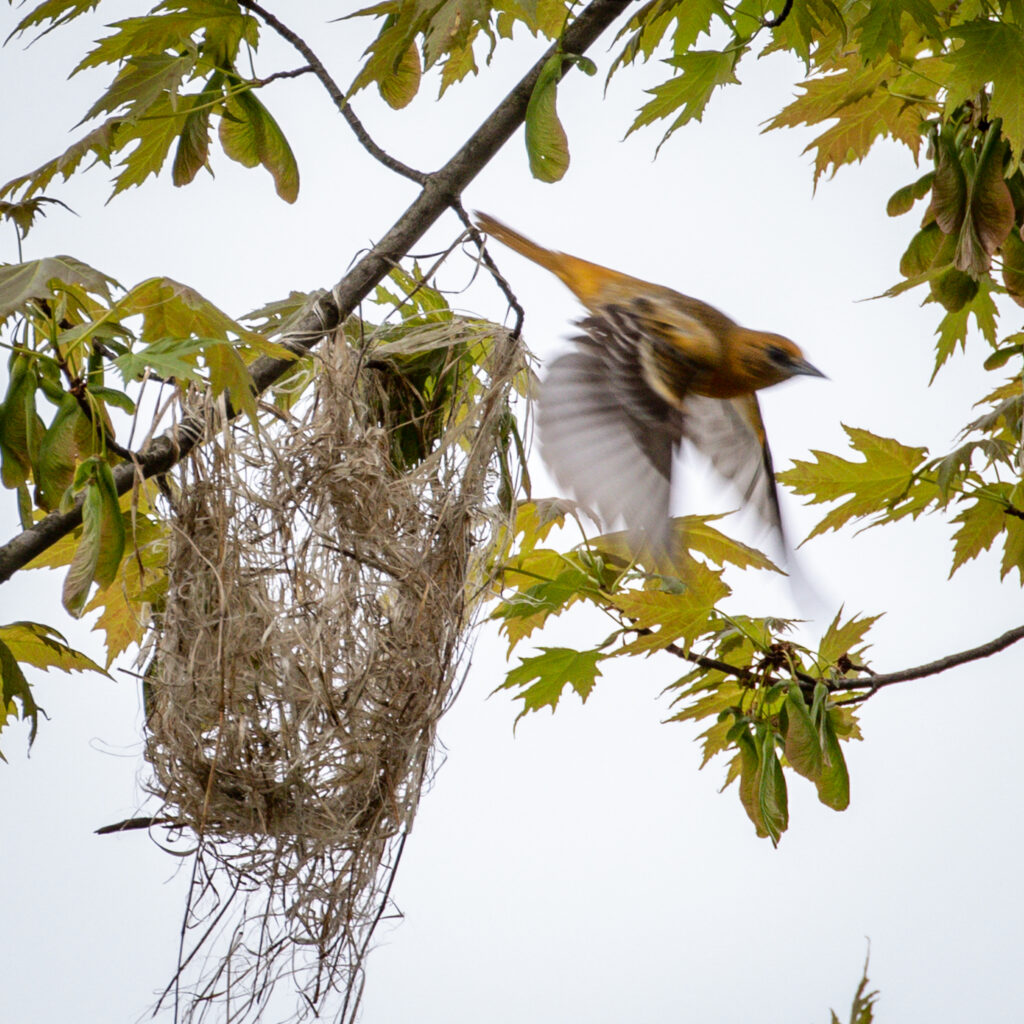
In our second example the bird is not technically “out of focus” but it is blurred due to its motion. The nest is in focus but the bird is not – a Documenting Shot.
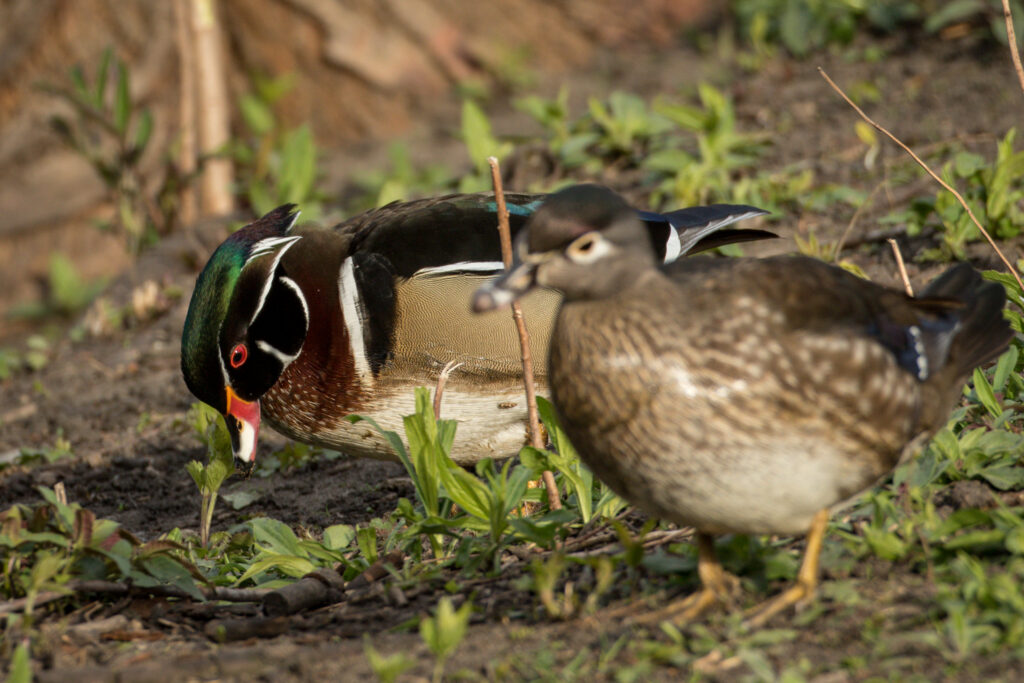
Some of the bird is in focus = Good Bird Photo
For a variety of reasons some of the bird in an image may be in focus and other parts not. When this occurs the image would be deemed a Good Bird Photo. In our first example below, the male Wood Duck is in good focus, yet due to a narrow depth-of-field the female is completely out of focus.
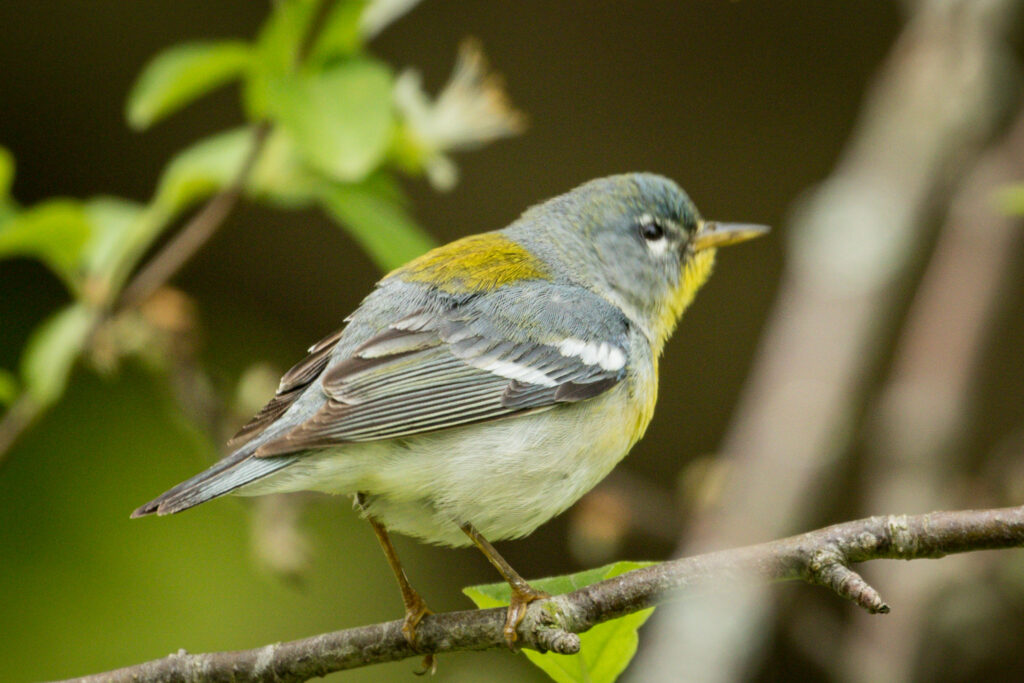
Below we clearly see most of the Northern Parula’s field marks (green patch on back, white wing bars, etc). However the head is not in focus, either due to movement. A Good Bird Photo.
All of the bird is in focus* = GreatBirdPic
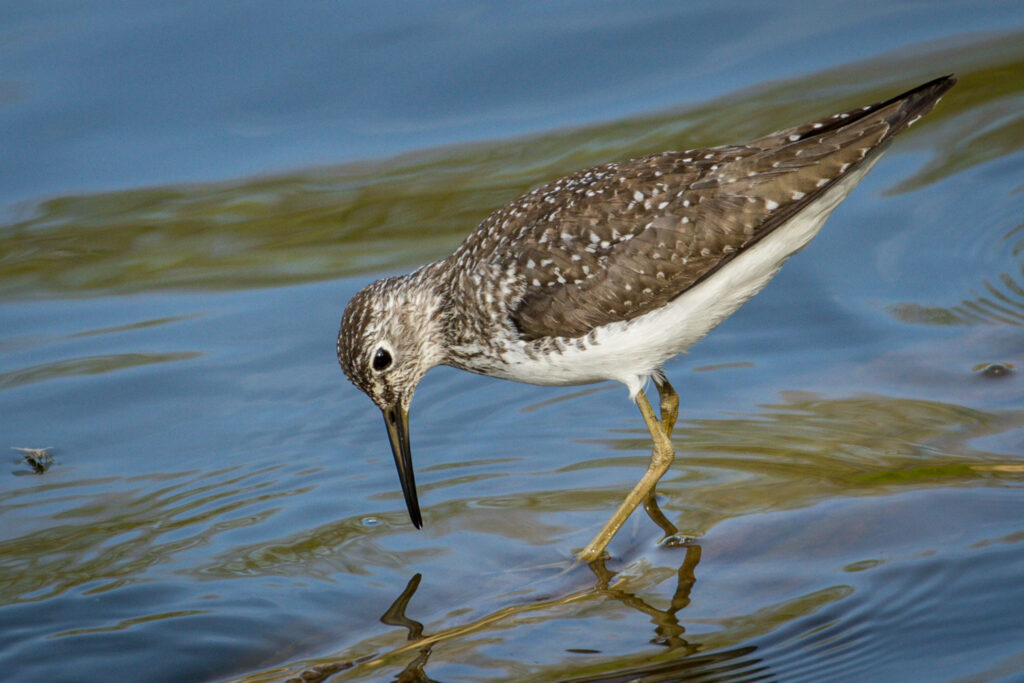
If you get all of the bird in focus, congratulations! Sometimes it’s pretty hard to get that. Notice the asterisk here; as noted above an image may not meet this rule exactly, yet it can still be a high quality bird photograph. So even if all of the bird is NOT in focus, it can still be considered a GreatBirdPic or even an Award Worthy type of bird photograph. Our first example below shows a Solitary Sandpiper in pretty good focus. You can make out some of the detail in the feathers, although it’s not tack sharp – A GreatBirdPic.
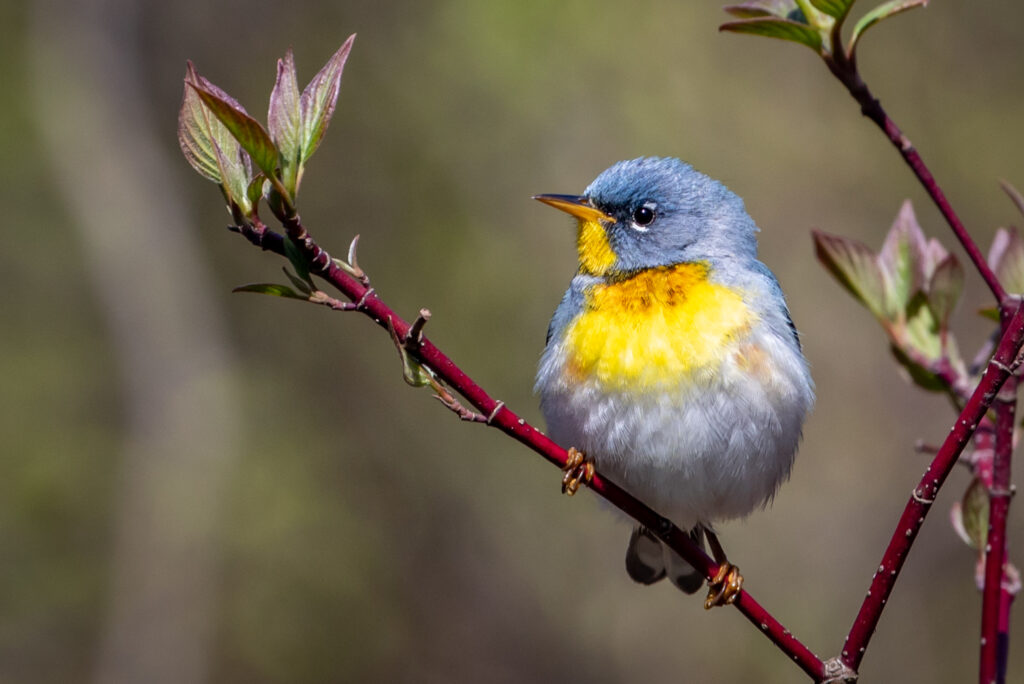
Here’s another shot of a Northern Parula. In this one, all of the bird is in focus making it a GreatBirdPic.
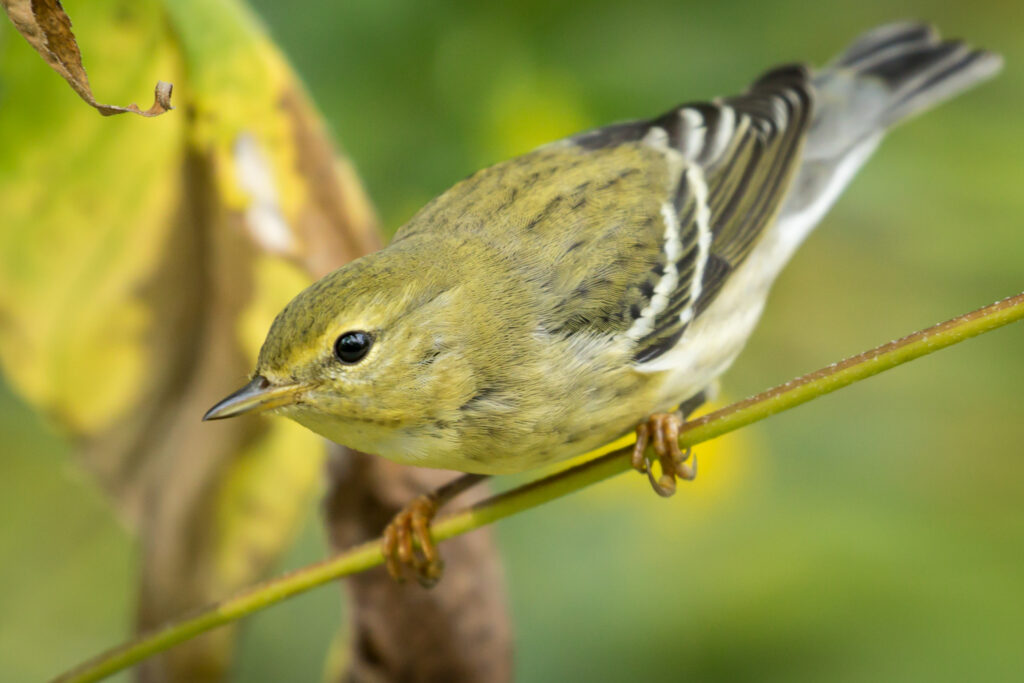
Next are a couple of images that illustrate the asterisk (*) for this Level of Quality. In the first one, the head, feet, and back of the Blackpoll Warbler are all in focus, yet due to a narrow depth-of-field, the tail is not in focus. Even so, it is still worthy of a GreatBirdPic designation.
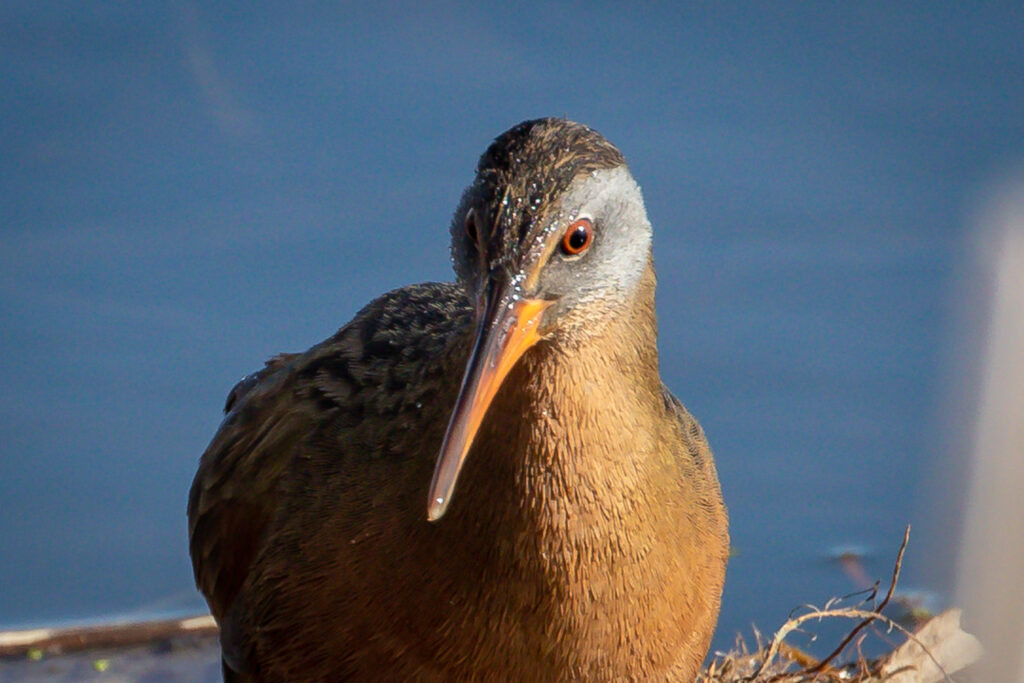
Below is a closeup of a Virginia Rail. The closeup leaves out parts of the lower body (by choice of the photographer), but the head and breast of the bird are in good focus. It does not meet the criteria for this Level of Quality exactly; since the asterisk gives us some wiggle room it is still considered a GreatBirdPic.
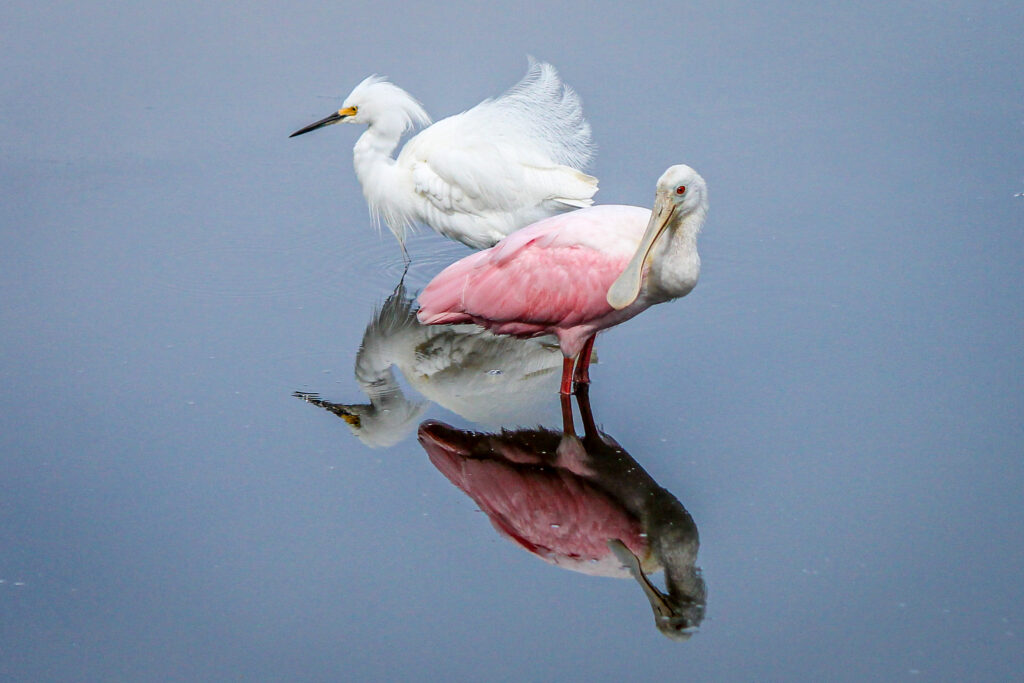
All of the bird is in sharp focus* = Award Worthy
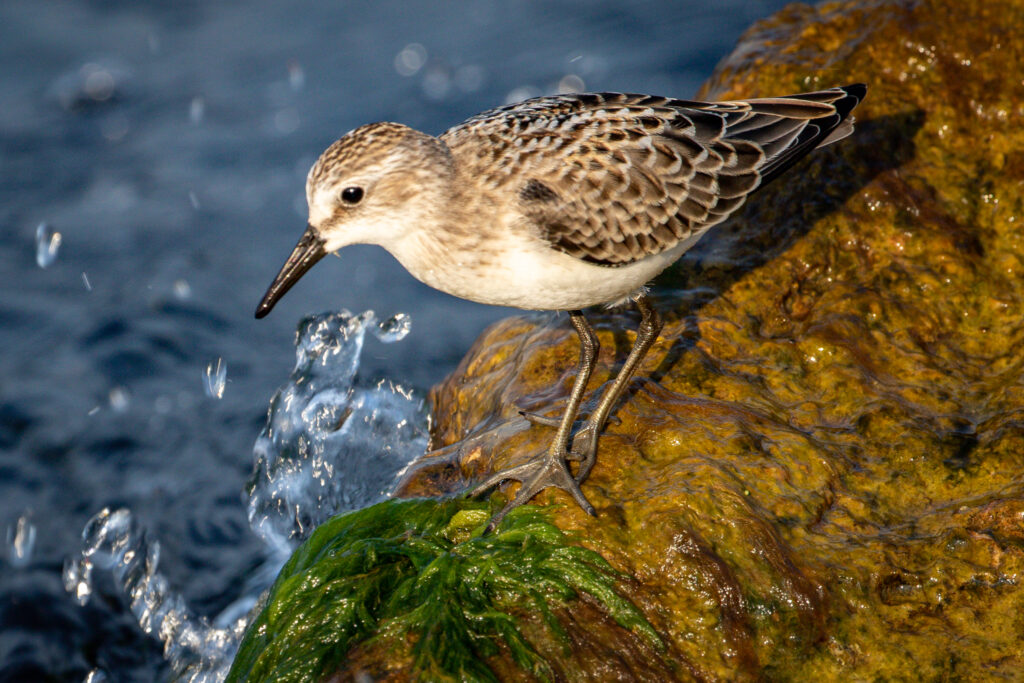
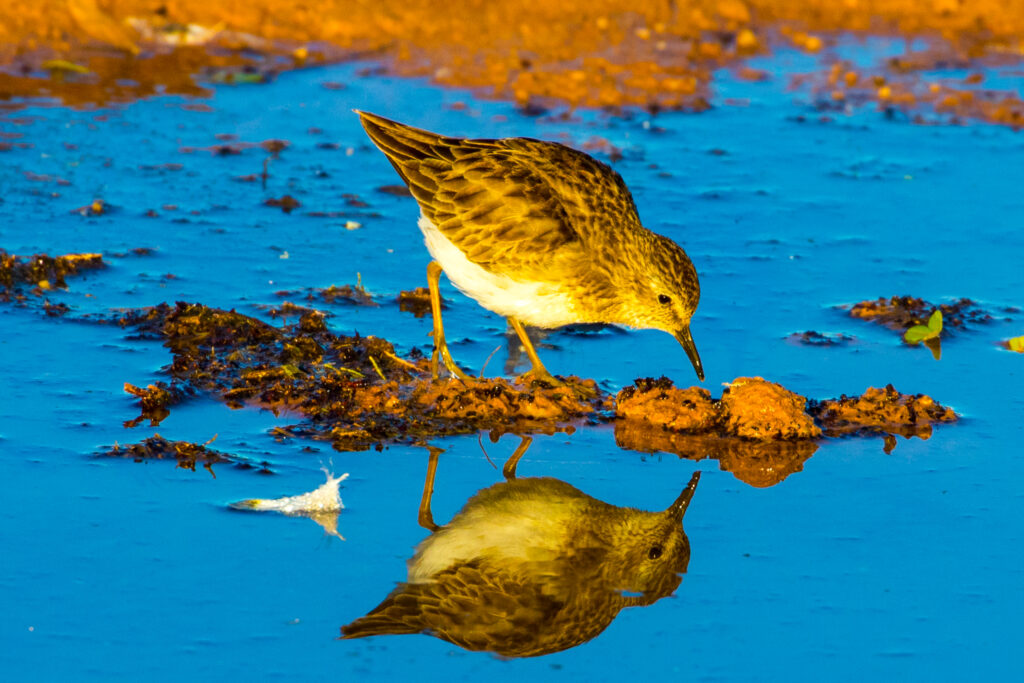
Let’s face it, there is focus and there is sharp focus and you can see the difference. When a bird is in sharp focus you can see every detail of the bird. Again the asterisk gives the photographer some latitude in how much of the bird is in “sharp focus.” In our first example below both the Snowy Egret and the Roseate Spoonbill are in sharp focus as they cross paths in the lake. The second example shows a Semi-palmated Sandpiper feeding along the rocks as the waves splash up. Everything is in sharp focus.
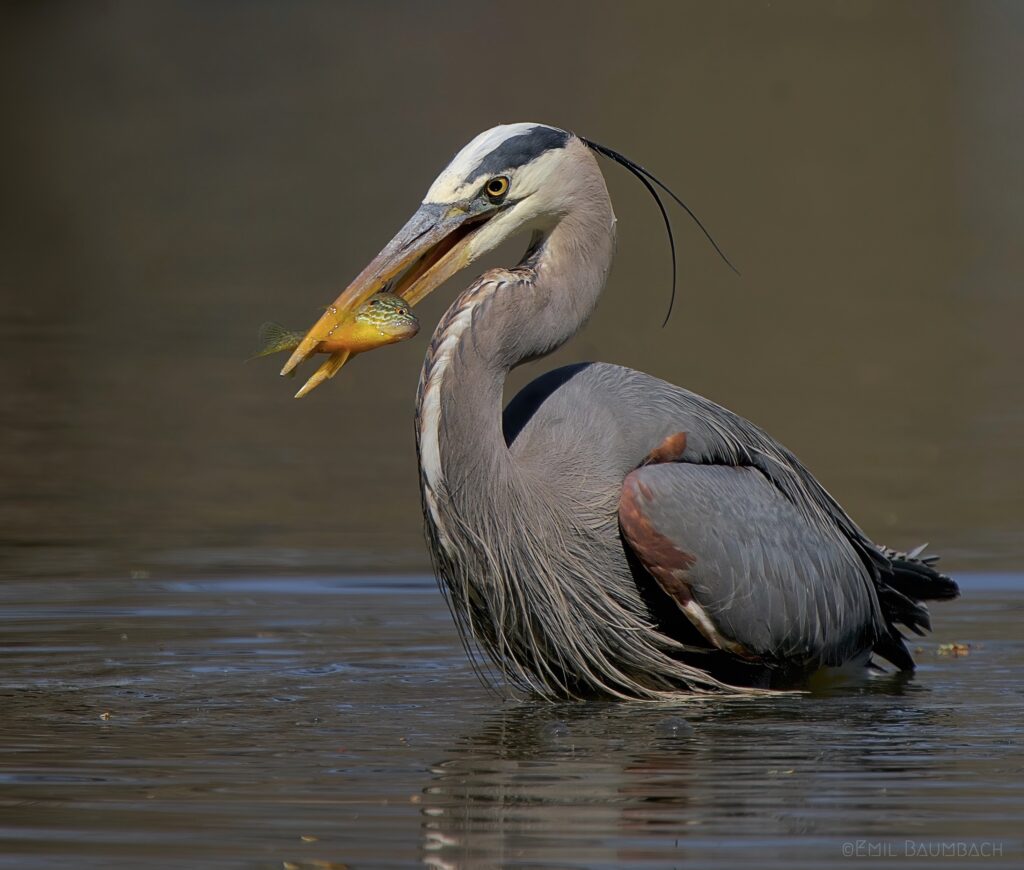
One example with the asterisk at this level. Emil Baumbach captured this Award Worthy image of a Great Blue Heron feeding. It doesn’t show “All of the bird…” but it doesn’t need to.
Just remember that the Levels of Quality are not hard and fast rules but are generally mapped one of the Four Types of Bird Photograph.
2. Exposure
As we continue to delve into the Quality Self-Assessment Rubric for Bird Photographs (QSAR) many of the upcoming Components (i.e. Exposure, Lighting, Color Contrast, Cropping, and Composition) can be altered during post-processing. I use Lightroom Classic and there are about 20 different settings I regularly use to modify my images.
Some might question the use of post-processing software to enhance the quality of a bird photograph. A “purist” might say, “Ansel Adams would’t modify his pictures in post-processing.” They would be wrong. Ansel Adams was a master of the darkroom (the pre-digital way to do post-processing). In fact he even published a book titled The Print in which he described all the post-processing he did in the darkroom to produce his famous Mt. McKinley and Wonder Lake, Alaska photograph. If you would like to read more about the history of post-processing in the darkroom, click the following link, which takes you to another website: Ansel Adams, and Photography Before Photoshop.
With that behind us, the QSAR Component of Technical Quality Exposure is examined in this section. Exposure is the overall amount of light or dark in an image (the next Component Lighting refers to the amount of light just on the bird).
The Exposure Component of the QSAR:
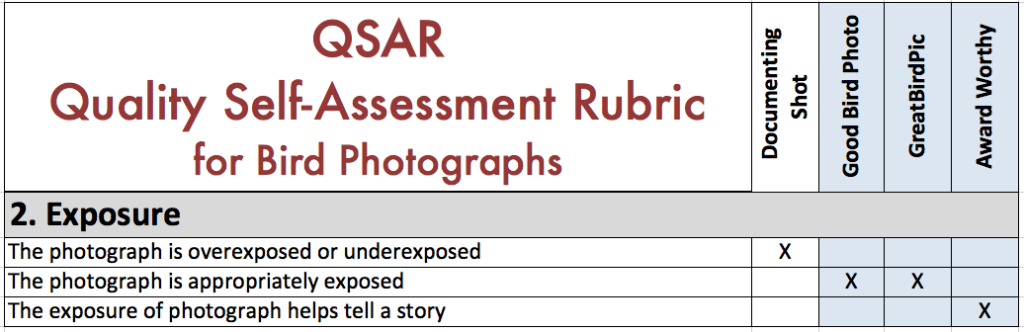
The Exposure Component has three Levels of Quality, which are described below:
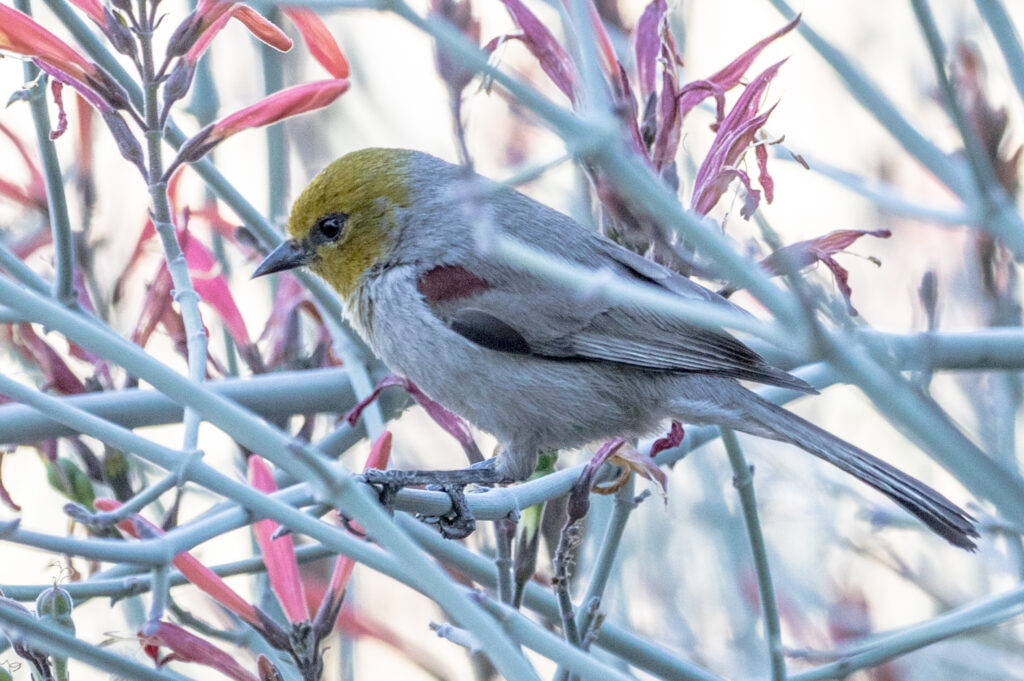
The photograph is overexposed or underexposed = Documenting Shot
Sometimes it’s tough to get just the right amount of light in a bird photograph. We may set up the camera to get the correct exposure yet the camera seems to have a mind of its own at times. This could result in an image which is too light or too dark. We are not talking about just the bird portion of the image but the overall exposure of the photograph. Oftentimes this can be corrected during post-processing. If uncorrected (or impossible to correct) the quality of the image usually would be judged a Documenting Shot.
In this first example, one glance at the image of the Verdin in foliage and we know everything is overexposed.
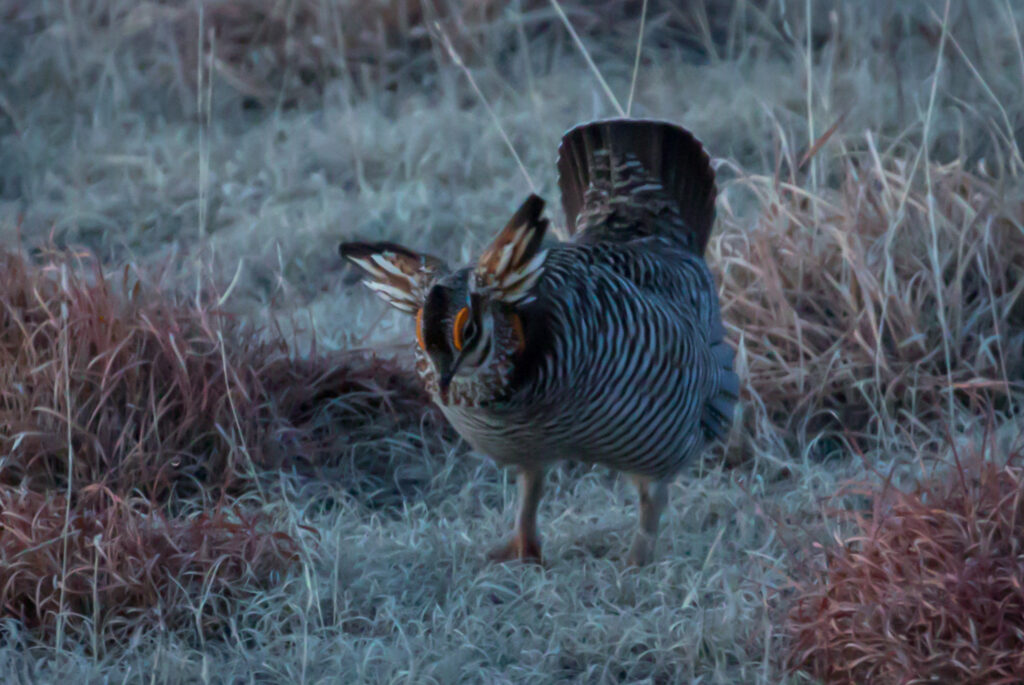
The next example was taken very early in the morning so the Prairie Chicken, along with the landscape around it, is underexposed. Even though the bird is interesting and has some detail in the image, overall this would be considered a Documenting Shot.
The photograph is appropriately exposed = Good Bird Photo or GreatBirdPic
When looking at photographs that are appropriately exposed, the overall exposure is neither too light or too dark – it’s just right. This Level of Quality is mapped to two different Types of Bird Photograph. If the lighting is correct, the resulting image may be a Good Bird Photo or it might be a GreatBirdPic – other factors (such as Focus, Cropping, and Composition) will determine which.
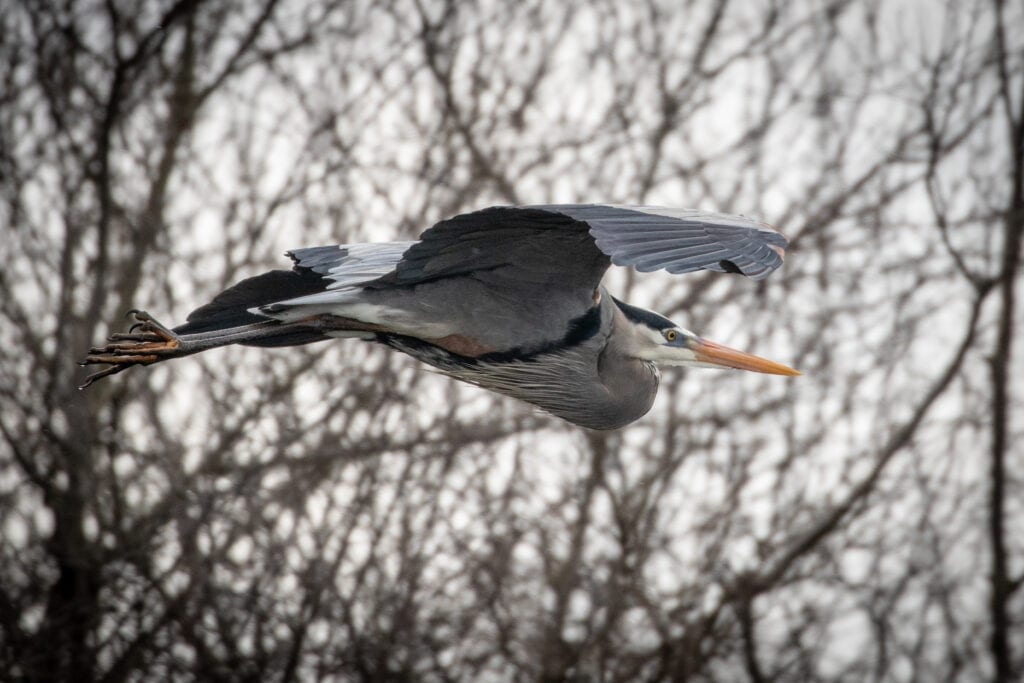
Here is an example of an appropriately exposed image that is a Good Bird Photo. Nothing special about this Great Blue Heron image, which was taken after it passed by.
Below is an example of a bird photograph with good exposure which is a GreatBirdPic quality. A Great Blue Heron perched on a log.

The exposure of the photograph helps tell a story = Award Worthy
This may be a bit nebulous, but the bird photographer carefully adjusts the exposure of the image to help give the overall impression desired. If the bird is in a dense forest, it may not look right to fully illuminate the image, conversely if the bird is on a bright, sunny beach the artist wouldn’t want the image to be too dark. The exposure should help convey what is going on around the bird to the audience. Below is Emil Baumbach’s Great Blue Heron picture. The exposure is a touch dark, which gives the viewer the impression that the bird is tucked away in a hidden place – it helps tell a story.
3. Lighting
The Lighting Component of the QSAR is more about the bird than the overall image. We want to see the bird illuminated properly. Depending on the situation you could have a picture that is overall correctly exposed but the bird is too dark or too light. Or perhaps the head is in shade and the rest of the body is well-illuminated. Here is the Lighting section of the QSAR:
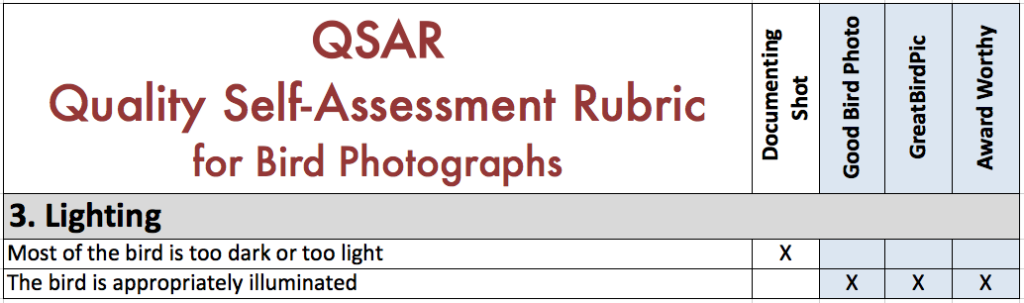
There are two Levels of Quality for this Component; either you have the lighting right or you don’t.
Most of the bird is too light or too dark = Documenting Shot
The bird is our primary focus so when most of the bird is under-exposed or over-exposed the quality of the photograph is low; A Documenting Shot at best. Below is a pic of a Sora feeding in the reeds. Because it was backlit (the sun was behind the bird shining toward the camera) the overall exposure of the image is appropriate but the Sora itself is cast in shadow, making it difficult to see.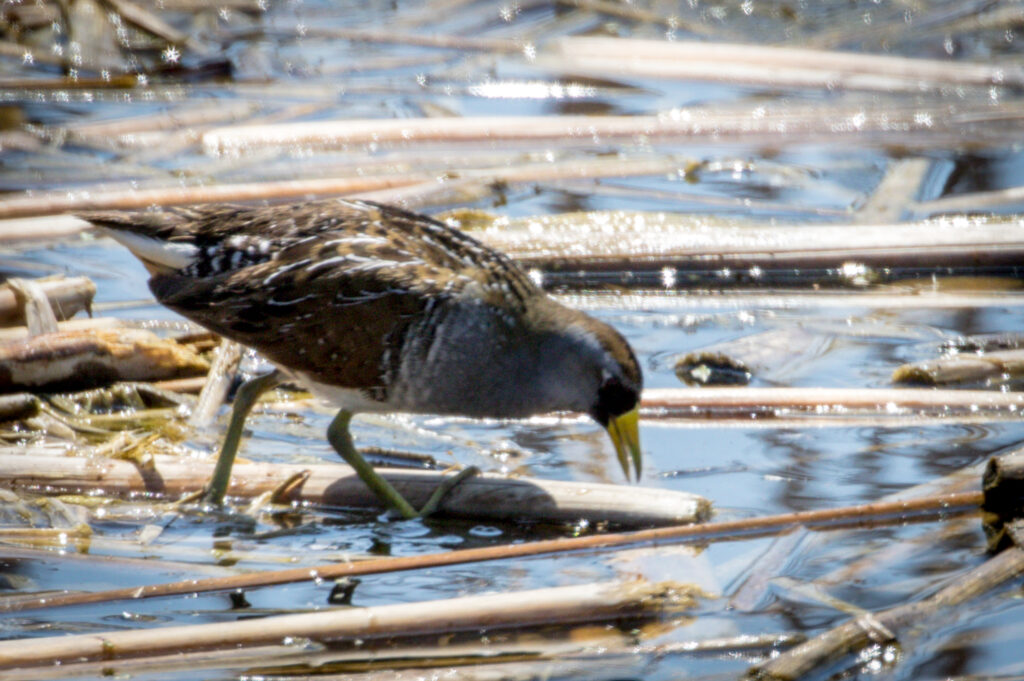
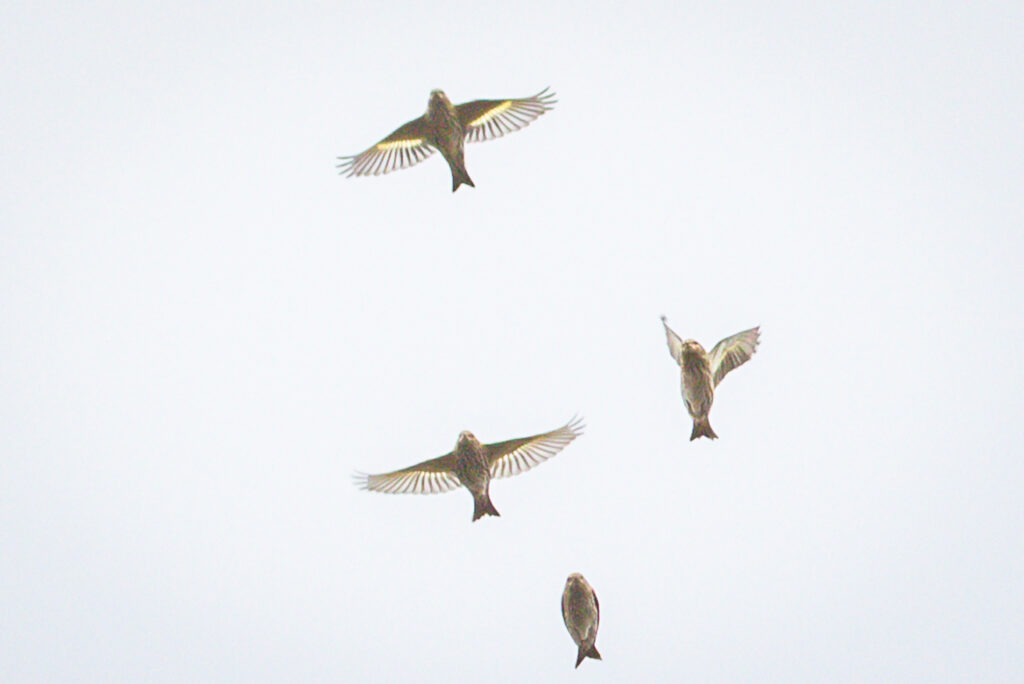
When trying to capture the flight of some Pine Siskins I had to shoot up into the bright sky. This make the entire image too light, including the birds.
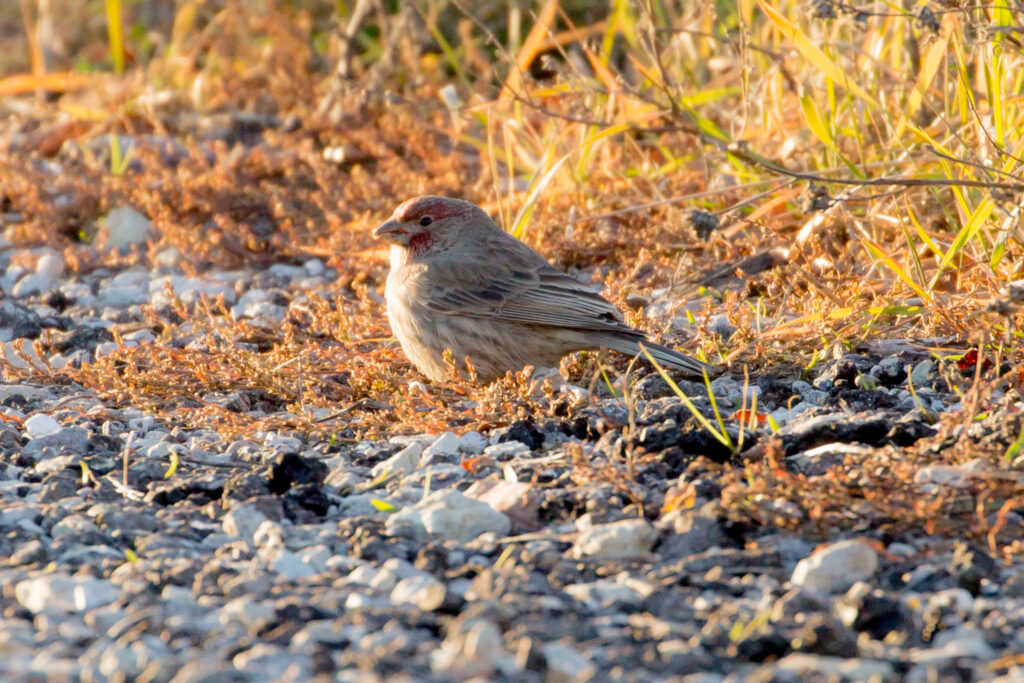
Sometimes you can’t win – the light coming in from the side of the bird can overexpose the side facing the sun and underexpose the rest of the body like in this House Finch below.
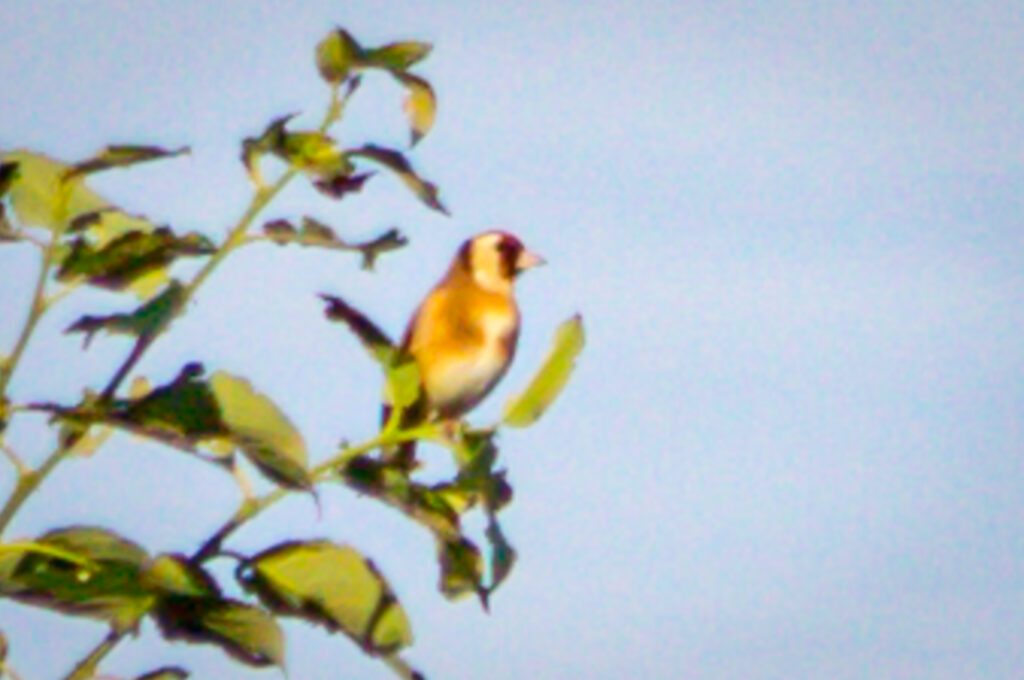
The bird is appropriately illuminated = Good Bird Photo, GreatBirdPic or Award Worthy
Most of the bird photographs on GreatBirdPics.com fall in this category – our members submit well-lit photographs. As you can see a well-lit photograph could be deemed a Good Bird Photo, GreatBirdPic or Award Worthy photo as other factors (such as Focus, Cropping, and Composition) will determine which. In our first example I took a shot of a European Goldfinch from far away and had to use an extreme crop to see enlarge it. Well-lit, but barely a Good Bird Photo.
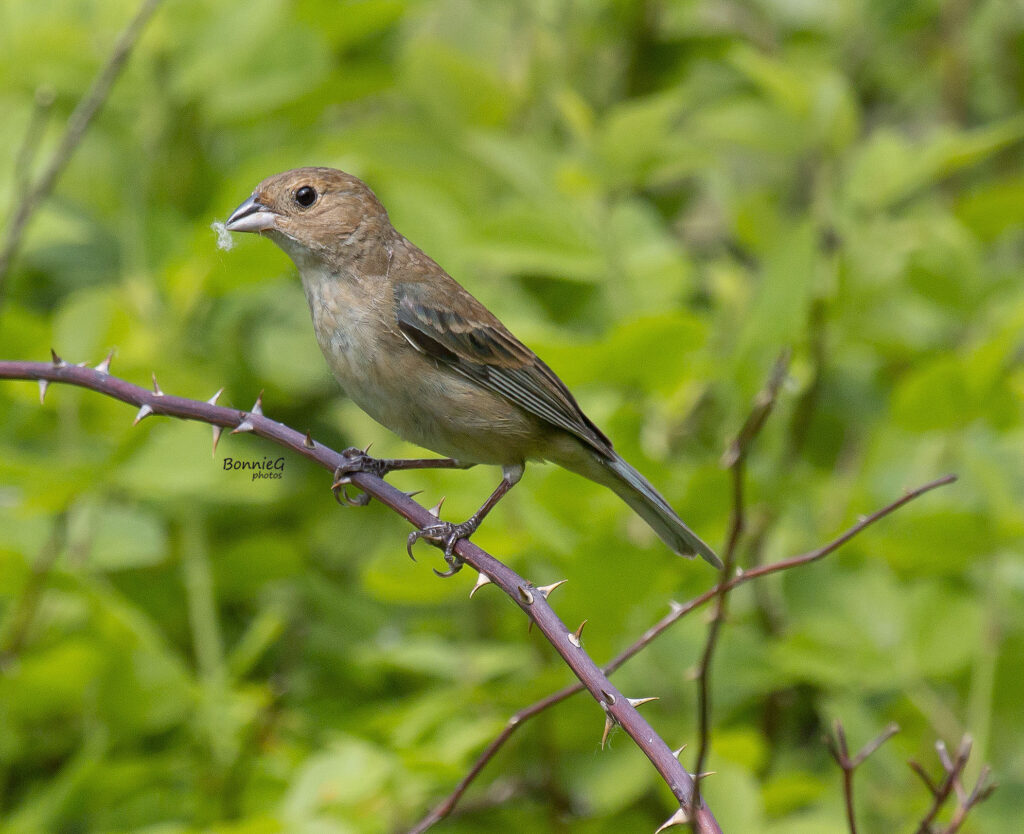
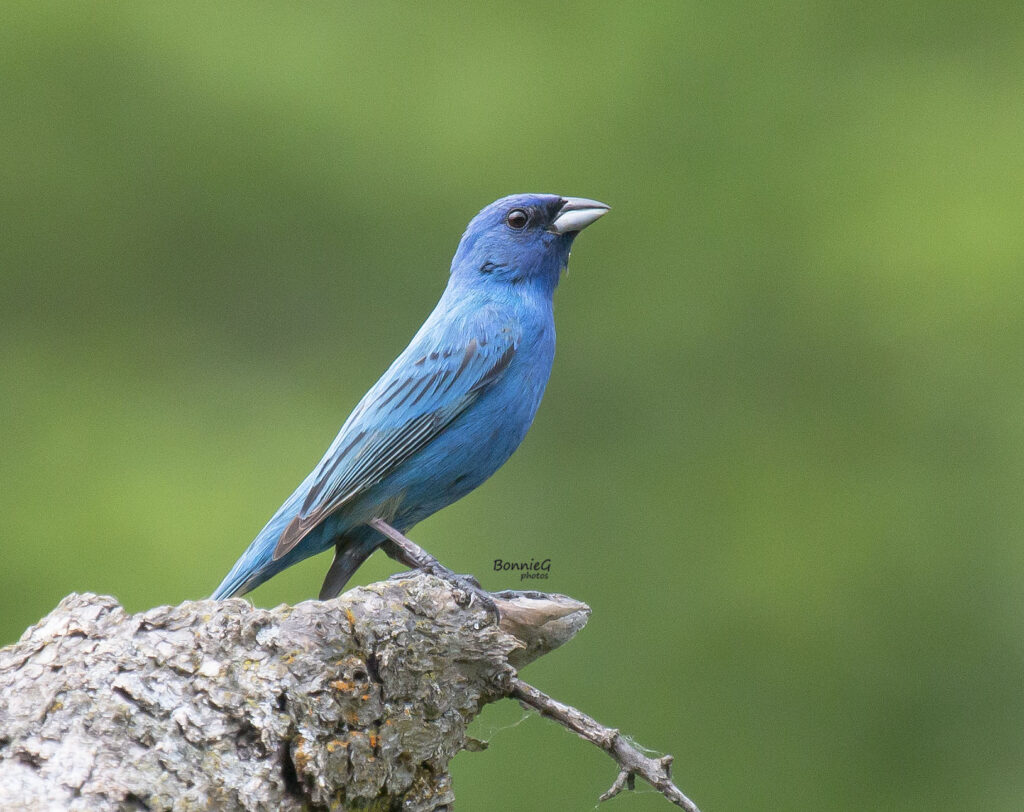
Birder2011 submitted a female and male Indigo Bunting. Great lighting in both shots; particularly on the male (the dark color blue is often hard to capture detail) – both a GreatBirdPic.
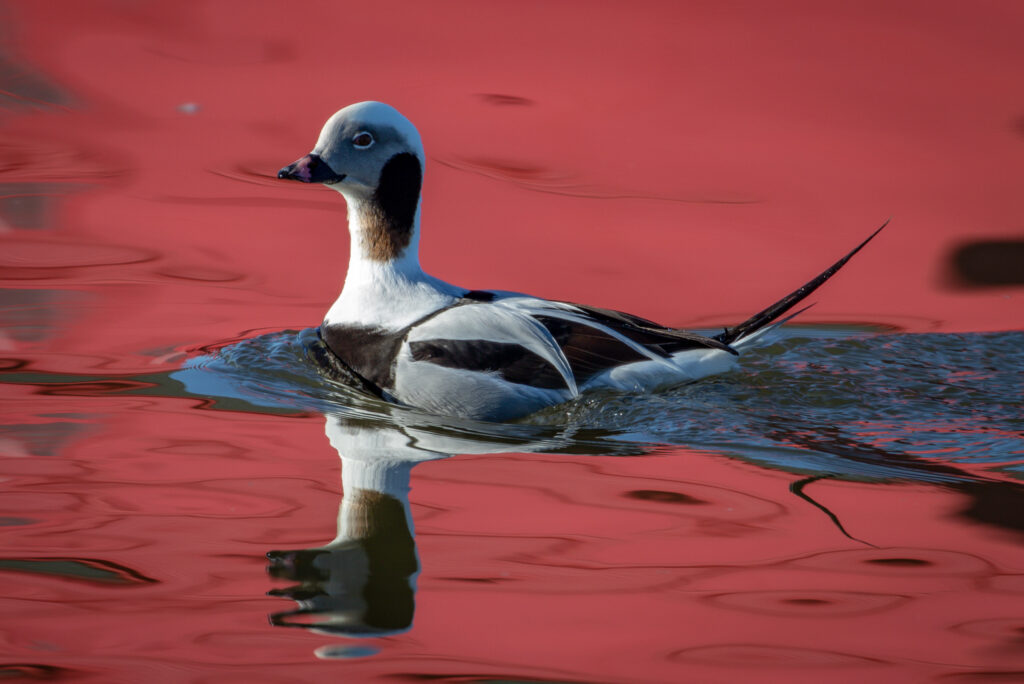
Below is a pic that breaks the Lighting conventions. The interesting light play around the head and body, and the reflection of the lighthouse named “Big Red” in Holland, MI help elevate this pic to Award Worthy.
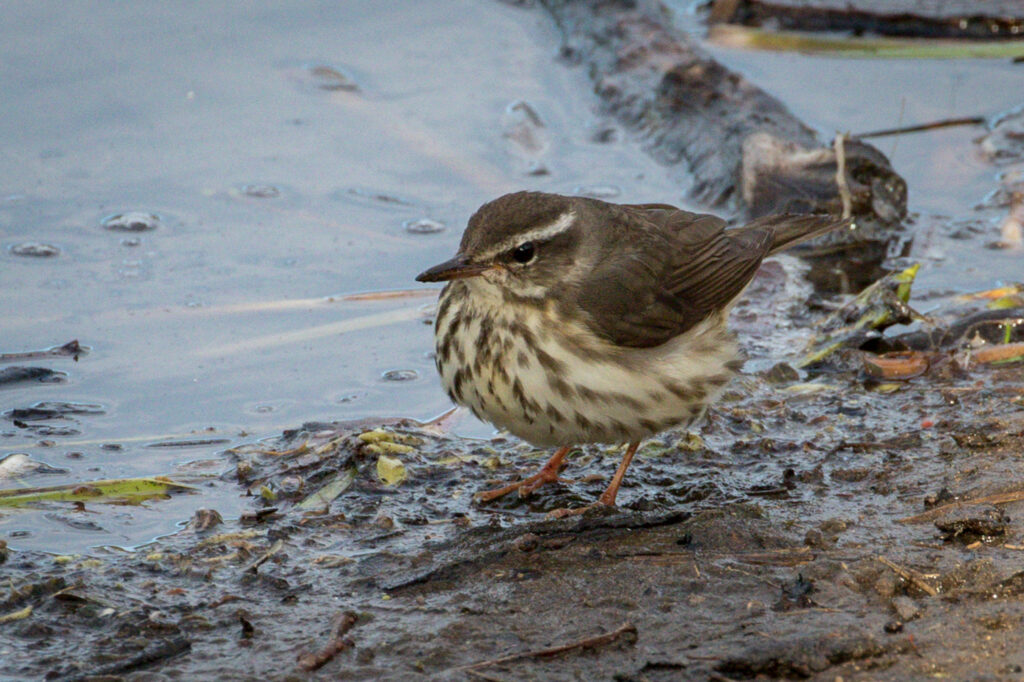
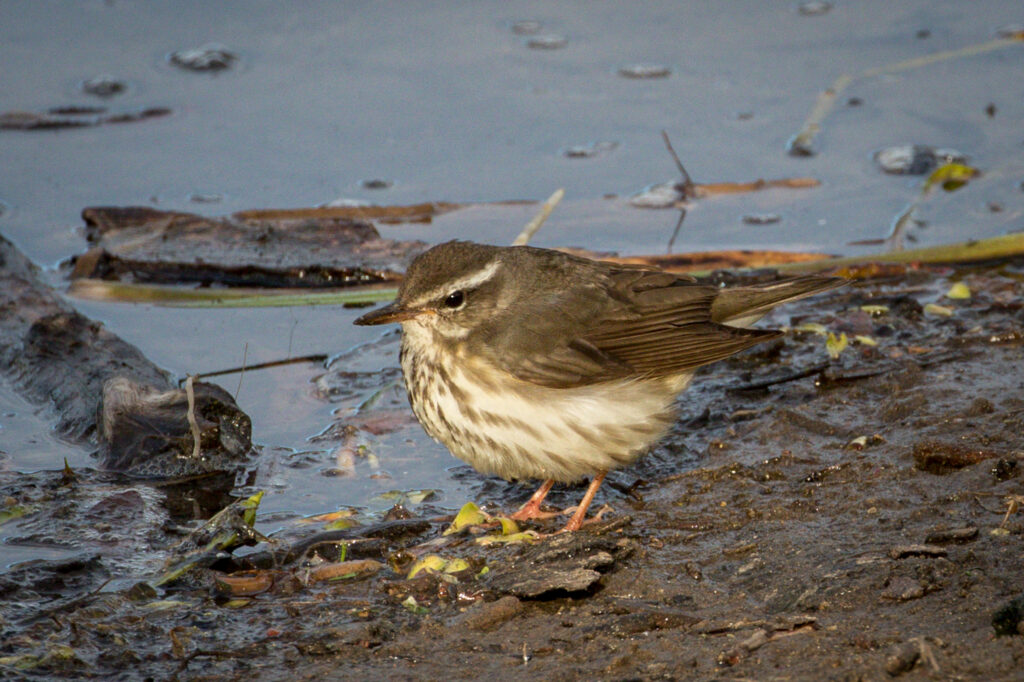
Another note about Lighting – the sun is our friend. Sometimes, even on a cloudy day, there is enough light to get good photographs. However when compared to the same shot in the sun, the cloudy day images look flat. Take a look at the two images below of a Louisiana Waterthrush. They were taken just seven seconds apart; the first one was taken in the shade, the second one taken when it had hopped into a patch of sunlight. The first one looks OK until you look at the one below it and you can see so much more detail and vibrancy in the colors.
Sometimes we take the Exposure and Lighting in our bird photographs for granted. Small adjustments during post-processing can make a big difference in the final quality of the image. We turn now to the next Component, Color Contrast.
4. Color Contrast
We continue to delve into the Quality Self-Assessment Rubric (QSAR) for Bird Photographs; the next QSAR Component of Technical Quality, Color Contrast is presented below with two Levels of Quality:
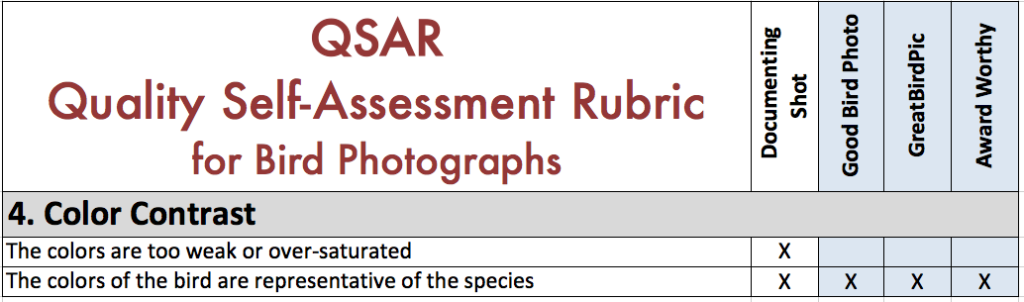
The colors are too weak or over-saturated = Documenting Shot
Cameras do a pretty good job of capturing the colors in most settings. If the lighting is right the image’s colors will be pretty true to the bird. One exception is when the White Balance is not set correctly. By leaving White Balance in “Auto” mode the camera usually makes the right choice.
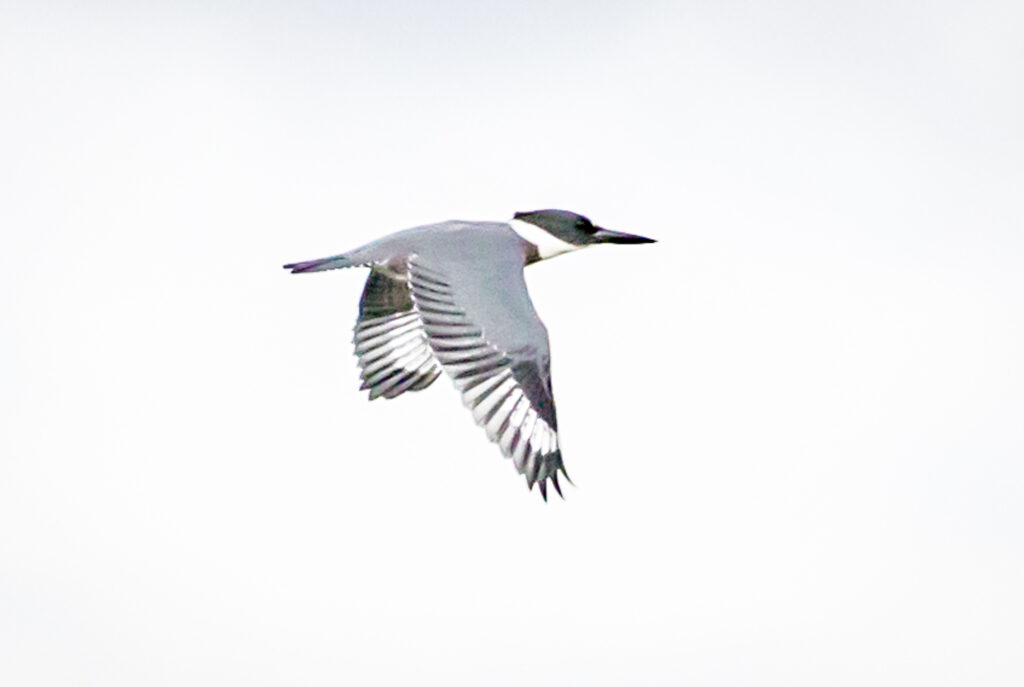
In some extreme situations the colors can be washed out, such as a back-lit setting (the camera is facing the sun). Sometimes this can be corrected during post-processing. If uncorrected (or impossible to correct) the quality of the image would be judged a Documenting Shot.
In the Belted Kingfisher example below the colors are washed out because the camera was pointed toward the sun.
On the other end of the spectrum, the colors can become over-saturated – not due to the camera or position of the sun, but purposely done by the photographer during post-processing. The photographer may look at an image and want to make it even more colorful (beautiful?) by bumping up the Saturation, Contrast, or Vibrance. As a result the bird’s colors may not look natural at all. Here’s an image of a Least Sandpiper that was pretty good – until the Saturation was increased too much during post-processing.
If the colors are too weak, you may be able to recover them during post-processing. Just don’t overdo it.
The Colors of the bird are representative of the species = Documenting Shot, Good Bird Photo, GreatBirdPic or Award Worthy
As previously noted, most cameras do a pretty good job of capturing true colors. As a result all four Types of Bird Photograph can display the appropriate colors of the bird in the shot. Which type depends on other Components of the QSAR such as Focus, Cropping, and Composition.
5. Technical Flaws
Technical Flaws in an image are pretty rare (except for Noise, which is explained below). We see below that there are three Levels of Quality for this Component.
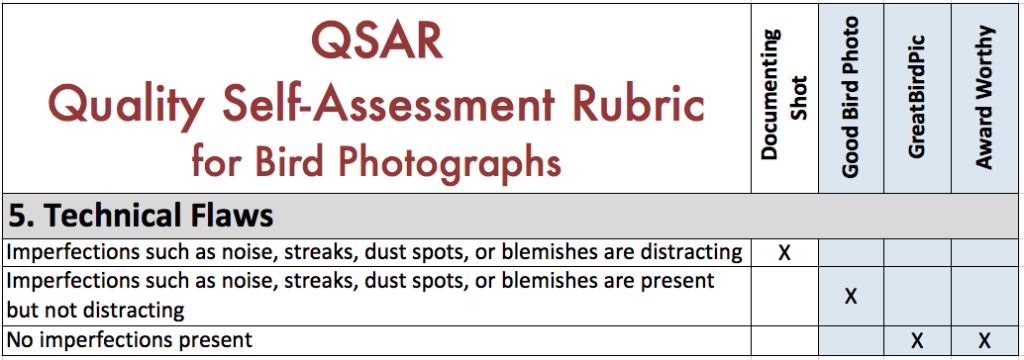
Imperfections such as noise, streaks, dust spots, or blemishes are distracting = Documenting Shot
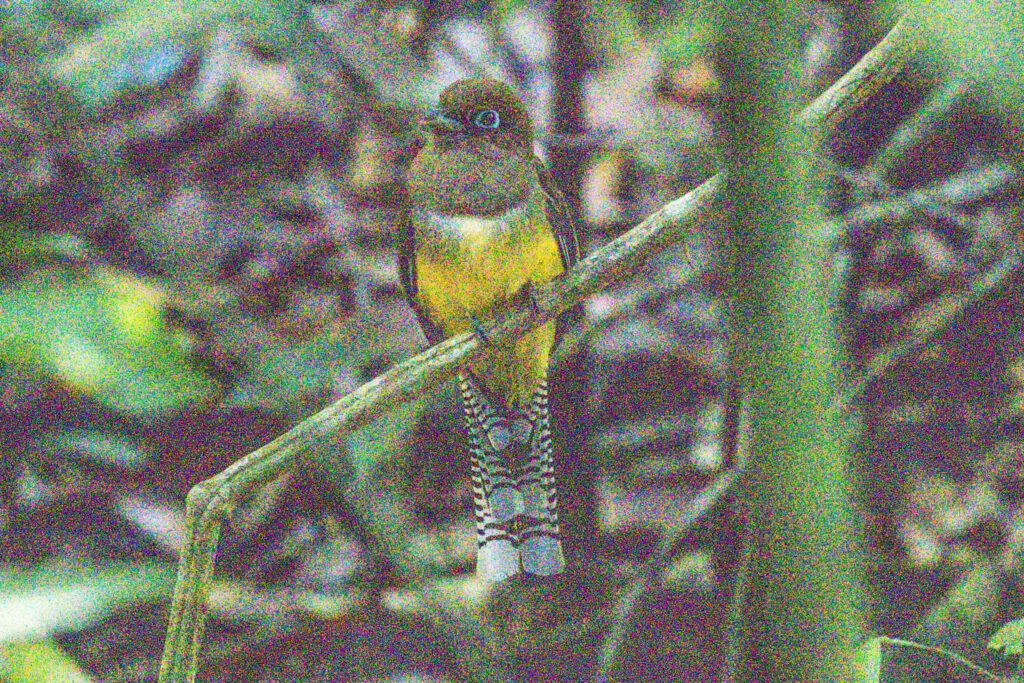
Noise isn’t really a Technical Flaw, but it can be a distraction. Noise is a visual distortion which shows up as grainy dots throughout the photograph. Noise can be introduced in an image in several ways: in low-light situations, when the ISO of an image is too high, when the exposure in post-processing is increased too much, or when an image is cropped down to a small area. Sometimes noise can be reduced or eliminated during post-processing. Our example below shows a Black-throated Trogan perched in the rain forest in Costa Rica. Very little light filtered through the canopy to the bird; the camera set the ISO to 16000, which introduced a lot of noise. Below the original is the same pic with most of the noise eliminated during post-processing. In extreme cases like this applying a lot of noise reduction also reduces some of the sharpness in the image.
Streaks of light in an image can occur when the camera is pointed in the direction of the sun. The light reflects back and forth between the lenses (the lens on your camera actually contains two or more focusing lenses). One way to avoid this is to use a lens hood.
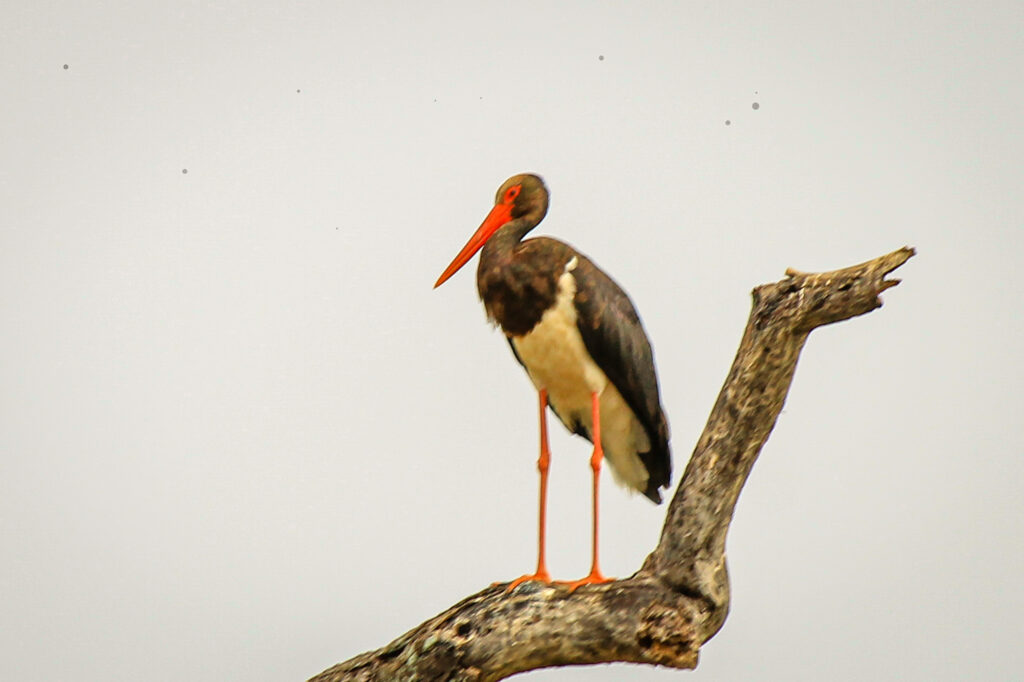
Dust spots occur when there is dust on the sensor of the camera. These typically show up when there is a light background (like the sky) and appear as small black dots, appearing in the same position in similar shots. Newer cameras either have a menu command for dust removal or automatically clean the sensor (my camera does it every time I turn it off). If the dust spots persist I wouldn’t recommend trying to clean the sensor yourself but take it into a camera shop for cleaning. Below is a picture of a Black Stork with a couple of dust spots in the sky.
In rare cases a blemish is introduced into an image by the lens. If the lease is dirty – a finger smudge or a lot of dust – they can appear or distort your photographs. If the lens has a scratch on it, the imperfection can appear on the images. The best way to avoid this is the keep your lens clean and protect it with a lens cover.
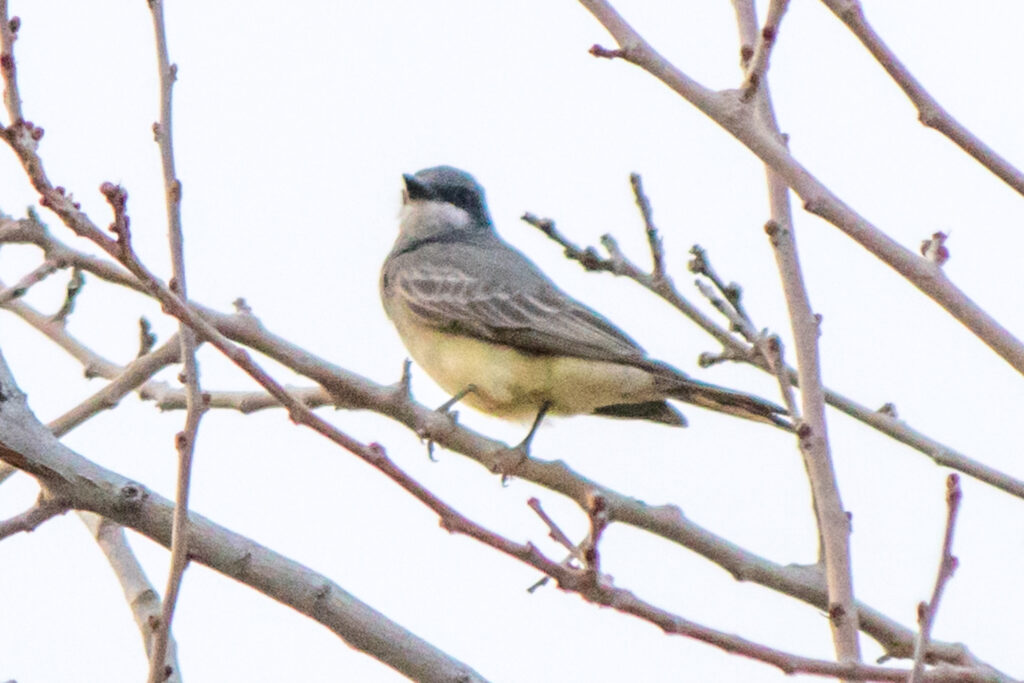
Imperfections such as noise, streaks, dust spots, or blemishes are present but not distracting = Good Bird Photo
Sometimes it’s impossible to eliminate all of the imperfections in an image. A little noise or a small blemish can appear without too much distraction. Below is an image of a Cassin’s Kingbird with some noise in it.
No imperfections present = GreatBirdPic or Award Worthy
We want our bird pictures as distraction-free as possible so our viewers can focus on the bird and its surroundings. GreatBirdPics and Award Worthy quality images will not contain any imperfections such as noise, streaks, dust spots or blemishes.
This is the end of the Technical Quality Component of the QSAR. To continue learning about the next Component, pull down the QSAR menu above and select Content.