Introducing QSAR
 GreatBirdPics.com is dedicated to showcasing its member’s beautiful bird photographs. That simple goal begs a complex question, “What makes a bird photograph beautiful?” To help bird photographers set up for success in the field, post-process their images appropriately, and to evaluate just how good their final images are GreatBirdPics.com has developed the Quality Self-Assessment Rubric (QSAR) for Bird Photographs. I recommend downloading the document before continuing so you can easily follow along. You can download the rubric if you CLICK HERE or use the QSAR menu above). Before presenting the QSAR tool, a little background.
There is a two-step process to produce a beautiful photograph of a bird. It begins in the field as the photographer approaches a subject, positions their camera, and adjusts the settings on the camera to capture the best possible image. The process ends when that image is finalized on a computer (with apologies to those who still use film). This two-step process is similar to my dad’s approach to painting a landscape picture.
My dad is over 92 years old and thoroughly enjoys painting (we probably have 15 of his paintings in our house). He goes out in search of a location he thinks might make an interesting subject. Once he finds a likely location he may go back there during different times of the day to find just the right lighting. He moves around trying to find the right angle from which to capture the subject. Then he sketches the scene out with some preliminary colors and shapes; he prefers to labor over his painting back in his studio so he works from a sketch or snapshot of the subject.
Dad then attaches the snapshot to his easel and begins the process of painting a beautiful picture. He thoughtfully selects from his quiver of brushes and his palette containing many paint colors, fusses over and changes each little detail as he attempts to create a painting he is happy with. Below is a picture of Dad in his studio teaching his oldest Great-grandson Mitchell how to paint while Mitchell’s dad Kevin looks on. Note one of Dad’s landscapes on the easel with a sketch of the location above it.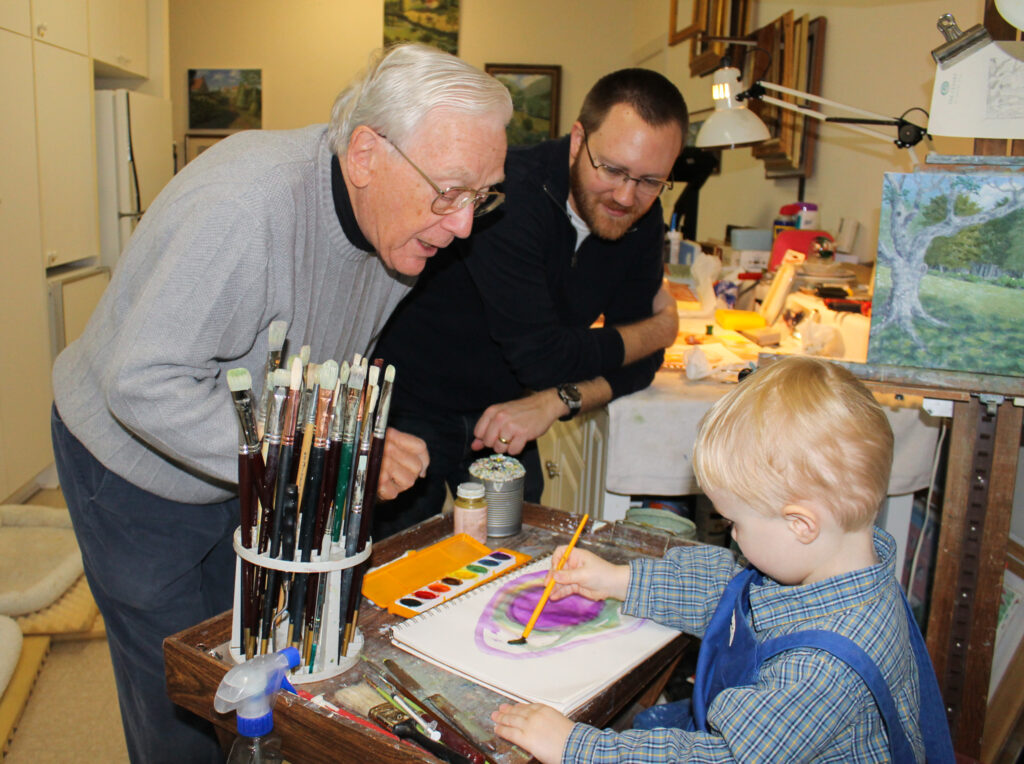
The bird photographer follows the same two-step process but uses different tools. The bird photographer approaches their subject (bird) carefully, trying to get just the right angle, shifting the camera around to get a better background or patiently waits fort the bird to forage its way into a patch of light. The bird photographer is always aware of where the sun is and the overall light conditions so they can position themselves where the bird is best illuminated and tunes their camera settings to record the photograph perfectly. Oftentimes many images of the same bird are taken in an attempt to capture the best image.
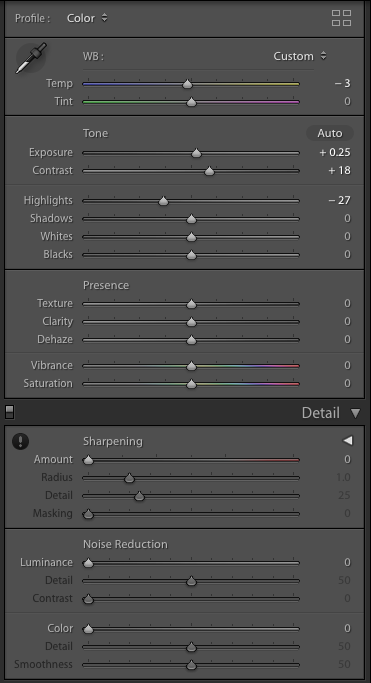
Like Dad, the bird photographer then goes home and sets up in their studio – their computer. Similar to Dad selecting from a wide array of paint colors, brushes and brush techniques the bird photographer selects from a photo editor’s wide array of options: exposure, crop, color balance, sharpness, etc. The photographer fusses over and changes each little detail as they attempt to create a photograph they are happy with. Below is my “palette” from Lightroom’s Develop Module.
The bird photographer then reviews all the images and selects the one(s) that have the best composition, shows the bird in the best light and angle, displays some originality, and will (hopefully) impact viewers so when they look at the photograph they gasp, “Wow!” Throughout the process Dad and the bird photographer use the tools at their disposal to create the best picture.
Our series begins in the studio, where the bird photographer edits their images by selecting various tools from their photo editor’s “palette.” The bird photographer should then sit back and determine how good their photographs are: are they good enough for eBird? to be on GreatBirdPics.com? to win an award in a photography contest? To help guide bird photographers make good decisions while editing and then selecting their best photographs GreatBirdPics created the Quality Self-Assessment Rubric (QSAR) for Bird Photographs.
QSAR’s rubric includes three Image Characteristics (Technical Quality, Content, Artistic Quality) and a set of Rules (Follows the GBP Guidelines). Each Image Characteristic is composed of 1 – 5 Components and each Component is further broken down into several Levels of Quality. By using the QSAR, a bird photographer can determine which of Four Types of Bird Photograph their final image falls in to. We define and illustrate each of the Four Types of Bird Photograph next.
It might help if you had printed a copy of the QSAR to refer to as you work through each article. You can download a PDF of it by Clicking Here.
Four Types of Bird Photograph, As Defined by Quality
The Quality Self-Assessment Rubric (QSAR) for Bird Photographs is designed to help amateur bird photographers improve the quality of their bird photographs. Even though the Four Types of Bird Photograph defined below are specific to GreatBirdPics.com they can be applied anywhere – from eBird (which uses a star rating system) to a photography contest which gives awards to the very highest quality bird photographs. Even a “Like” on Facebook is a judgement of quality. We begin with the lowest quality bird photograph and progress up to the highest.
Bird Photograph Type 1: Documenting Shot
The lowest quality bird picture is the Documenting Shot. Even though it is generally unacceptable on GreatBirdPics.com the Documenting Shot is included on the QSAR to show a continuity of photographic quality.
The Documenting Shot is usually taken to create a record of a sighting. I take a Documenting Shot when I only get a quick glimpse of a bird I can’t readily identify, of unusual actions by the bird I want to record, and of rare birds and Lifers I want for my files. Each type of Documenting Shot is defined below.
Types of Documenting Shot
Quick Glimpse – When I am out in the field and I see a bird zipping by overhead I’ll take a couple of pictures to document the sighting. Sometimes a bird is far down the path with someone walking toward it and I’ll take some pics before it flies off. Similarly, when a bird is flitting in and out of the foliage I’ll take a few pictures just trying to capture it before the bird disappears. Hopefully I can identify the bird in the pictures. Typically pictures like these are not appropriate on GreatBirdPics.com. Below is a Quick Glimpse of a White-crowned Sparrow on the trail ahead of us – not good enough for the website but good enough for identification purposes in case it flew off before we got closer: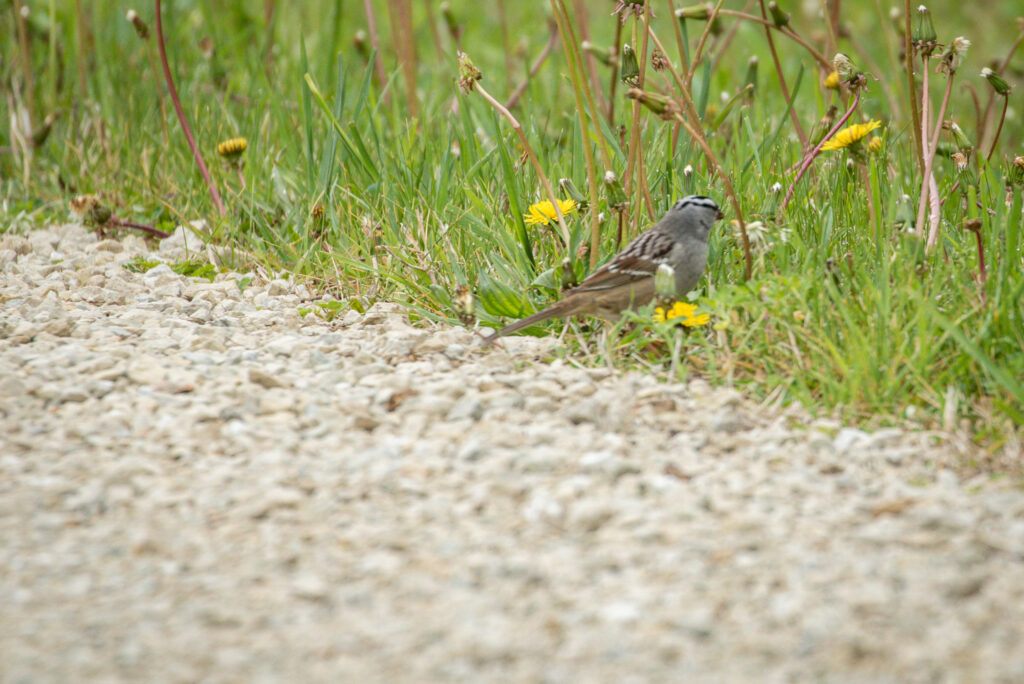
Birds That Are Hard To Identify – Let’s face it, a lot of birds look alike – shorebirds and sparrows come to mind. Sometimes I take a Documenting Shot and review it later (either on the camera or back home) to determine the species of the bird. Other times I spot a bird that’s so far away I can’t identify it using my binoculars so I take a picture and magnify the image. Many times these photos are low quality and are not appropriate on GreatBirdPics.com. Below is a picture taken at extreme distance and then cropped to magnify the image so I could determine they were Ring-necked Ducks; not good for the website but good enough to identify: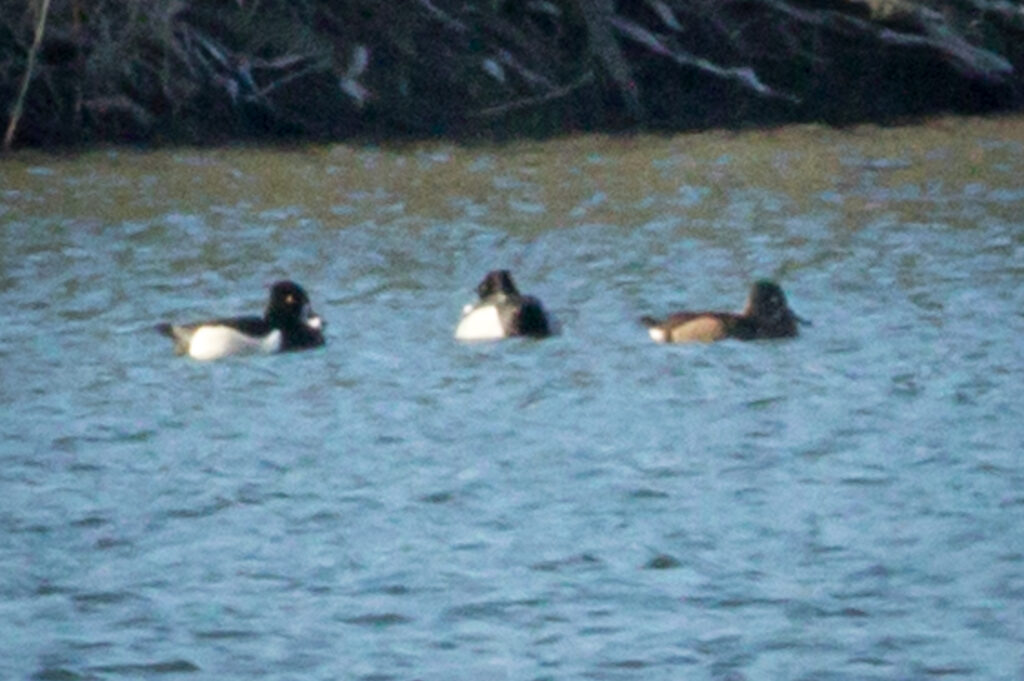
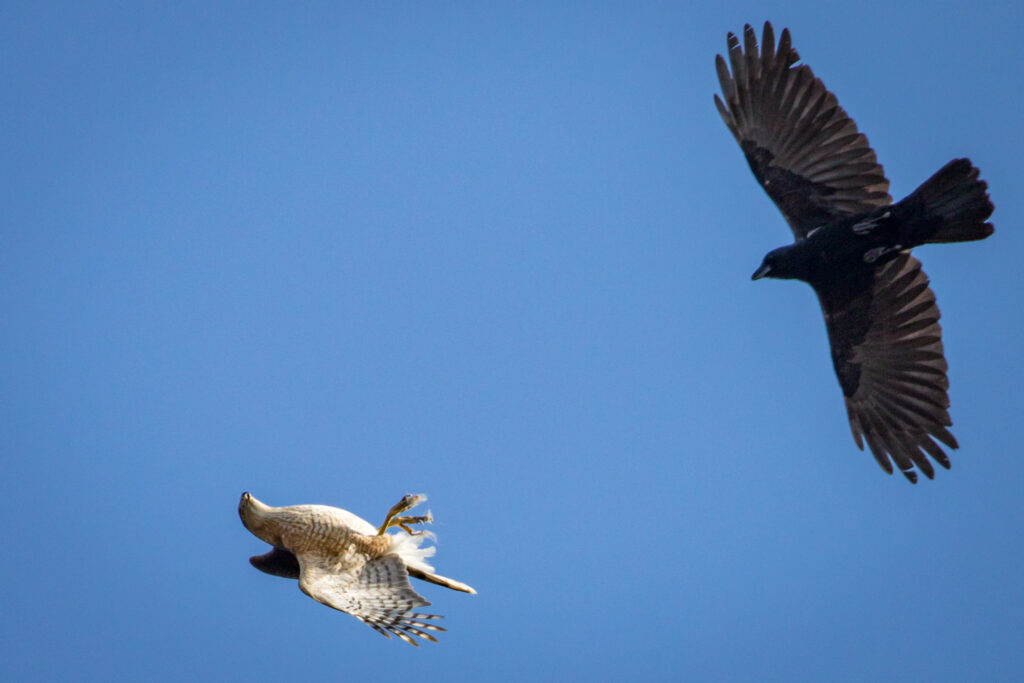
Unusual Activity – Not long ago I was taking a Documenting Shot of a Red-winged Blackbird harassing a Cooper’s Hawk. When I got home I found that I had captured the Cooper’s Hawk “Whiffling” or flying upside down. The image quality is poor but the activity was so unique I had to share it on the website. I included a full description of the activity on the Individual Page for the image (the image below is clickable for the full story).
Rare Birds and Lifers – By far I use Documenting Shots the most when recording rare birds and Lifers for my private collection. By definition I wouldn’t have any pictures of a Lifer so any time I see one I take a lot of pictures, no matter how bad the images are going to turn out. This occurred just the other day when our target bird was a Ruff, which is quite rare for Illinois. We found it, but we were facing into the sun; I took 115 pictures in an attempt to get a few for my files and to post on eBird (I did not post them on the GreatBirdPics.com). If you have a poor quality Rare Bird or Lifer pic that you just have to share with us please include a detailed description about the sighting so we can read why it was so important to you. Here’s a very rare Broadbill Hummingbird in Chicago – not a great pic but so rare I had to share it. Click on the pic and read the description I added:
In conclusion, bird photographers take Documenting Shots so they can either study the images for identification purposes or to have a record of the observation. In either case the photographer is more concerned about having a record of the sighting than the quality of the picture. As you can see in the examples above, Documenting Shots are lower quality pictures – out of focus, poorly lit, obscured by leaves. In general they should not be posted on GreatBirdPics.com – but I wanted to give our members a little “wiggle room” to include these types of pictures. Like when the activity recorded is rare (like Whiffling) or if you just have to share a Rarity or Lifer with us. If you post a Documenting Shot be sure to write a detailed description of what is going on in the picture and why it was important for you to post it. A Documenting Shot without context is not acceptable on GreatBirdPics.com.
Bird Photograph Type 2: Good Bird Photo
Many of the pictures I take are of Good Bird Photo quality. These pictures capture enough of the bird’s field marks so that another birder could look at it and identify the species. These pictures might be a little out of focus, or parts of the head or body may be obscured by leaves and branches. Parts of the body may be cut off at the edges of the photograph. The bird’s head may be turned away from the camera or in the shade. It’s a pretty good picture and photographs of this nature are acceptable on GreatBirdPics.com, particularly if it is a new species to the site or if there is an interesting tale to be told about it (in the Description section). The bottom line is an experienced birder should be able to look at a Good Bird Photo and identify the species, but the overall image itself has some flaws or may not be particularly interesting. Here are some typical Good Bird Photos and why they aren’t rated higher (you can click on each one and read the description of the shot):
The Carolina Wren on the left is almost in focus but the one on the right is not. Leaves obscure both birds. The action is interesting but poorly defined. Good not Great.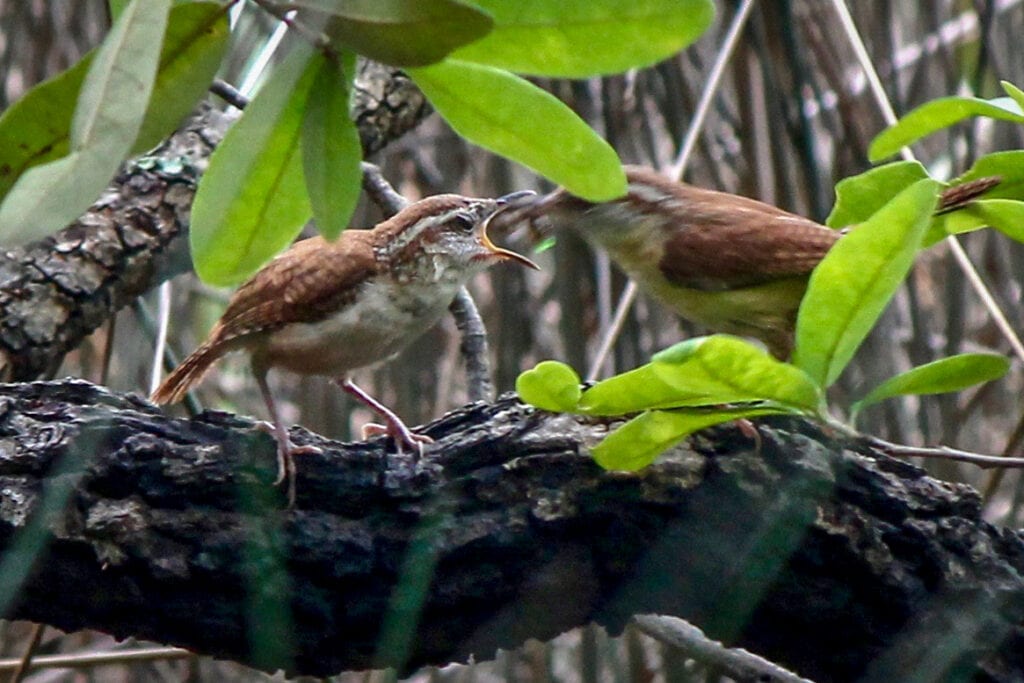
Although there appears to be a lot going on in the picture below it’s hard to make out much detail. Some of the birds are blurred by their movements. The image was cropped so much the quality of the entire image is degraded. Good not Great.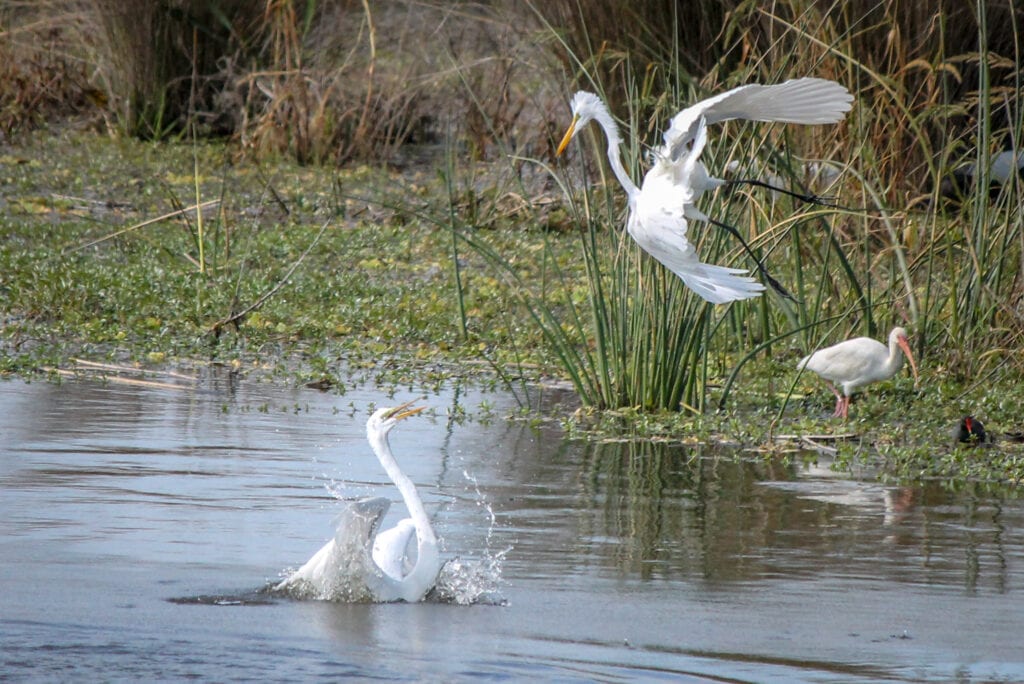
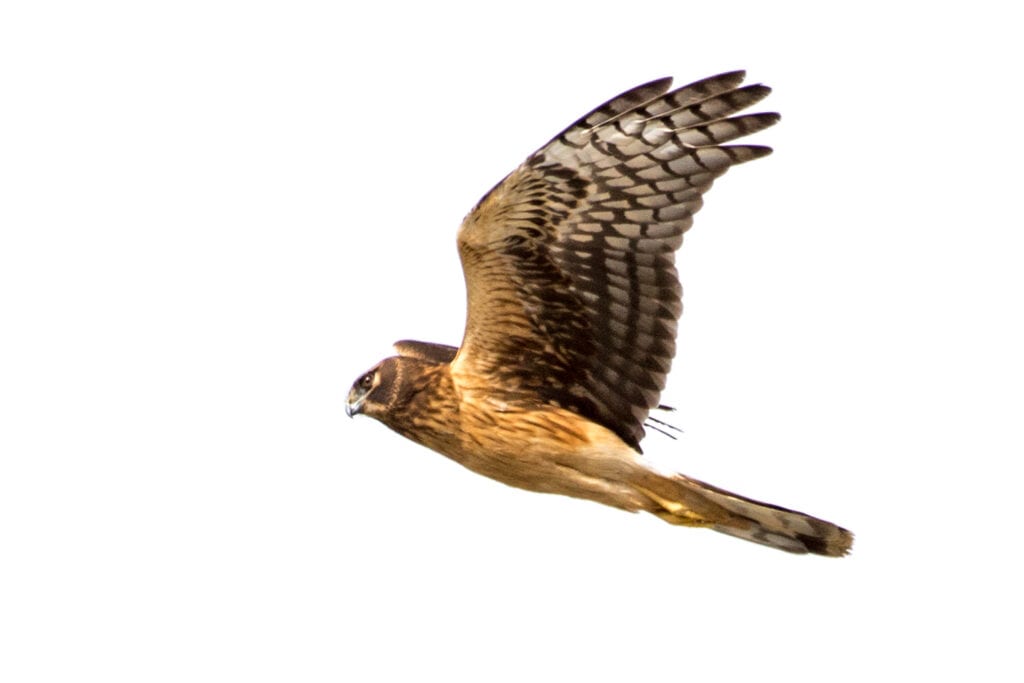
It’s always nice to catch a bird in flight like this Northern Harrier. Unfortunately it was on a cloudy day so the sky appears white in the photo. Good not Great.
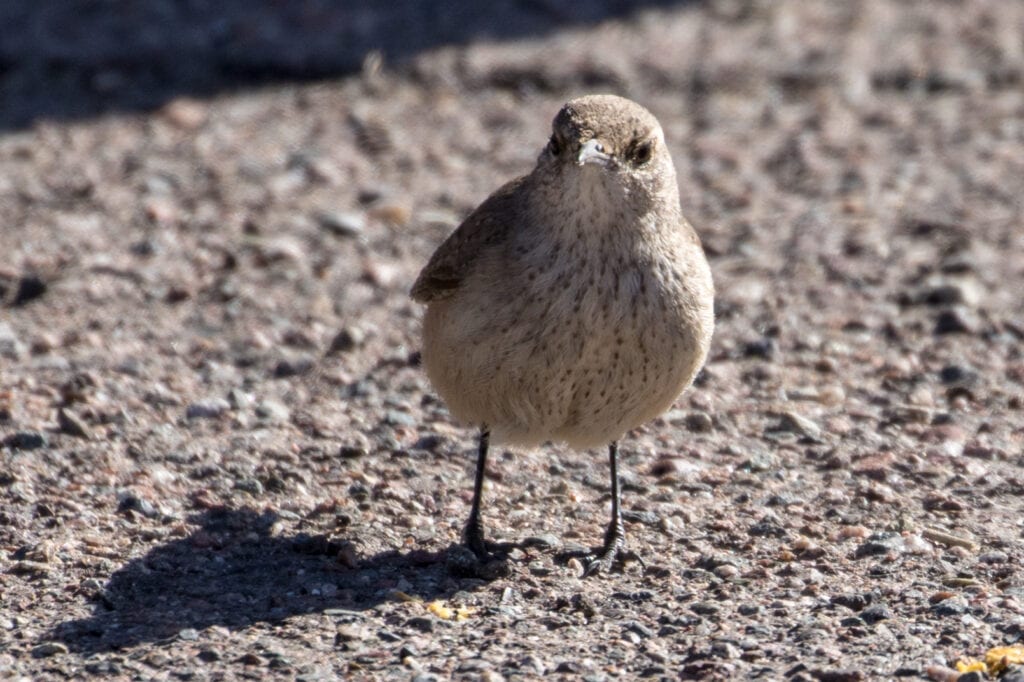
This Canyon Towhee is practically all in shadows. Although the focus is good with some sharpness, the lack of light on most of the the bird makes this image Good not Great.
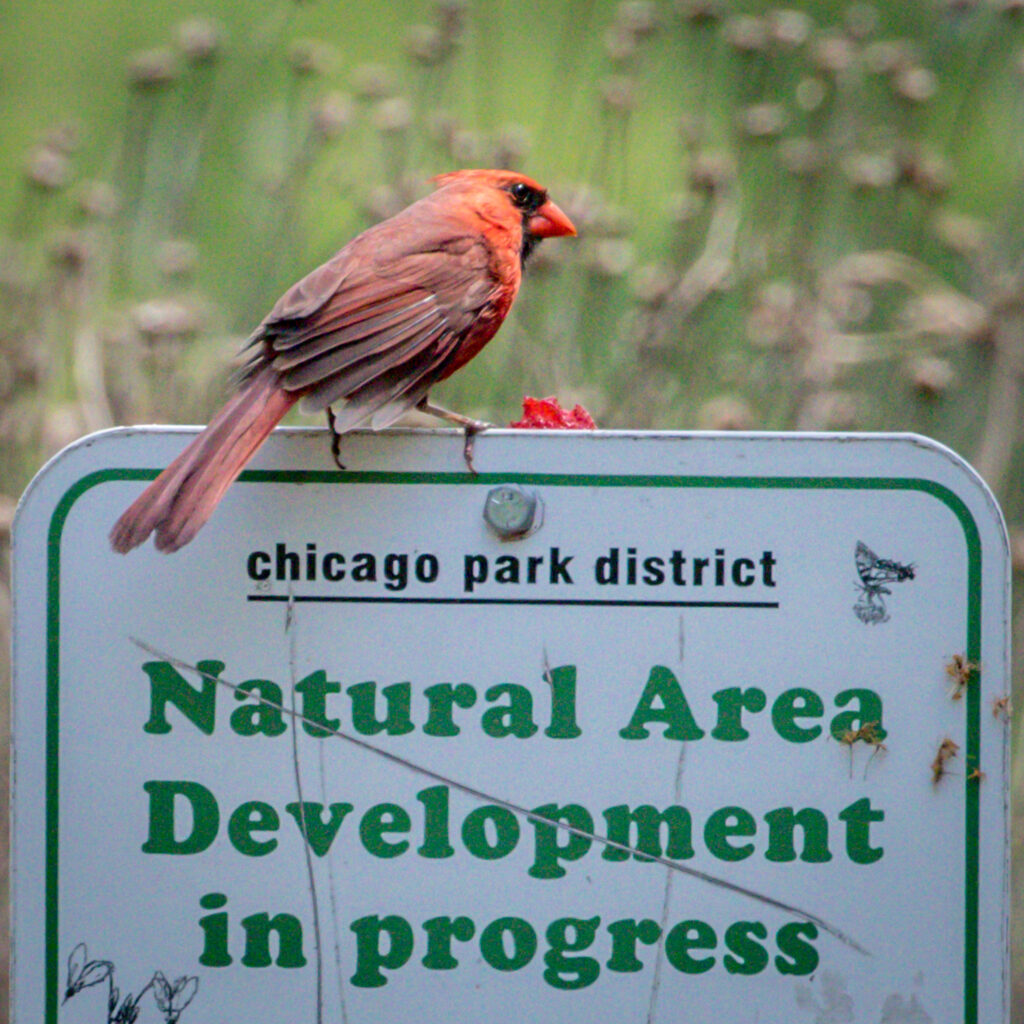
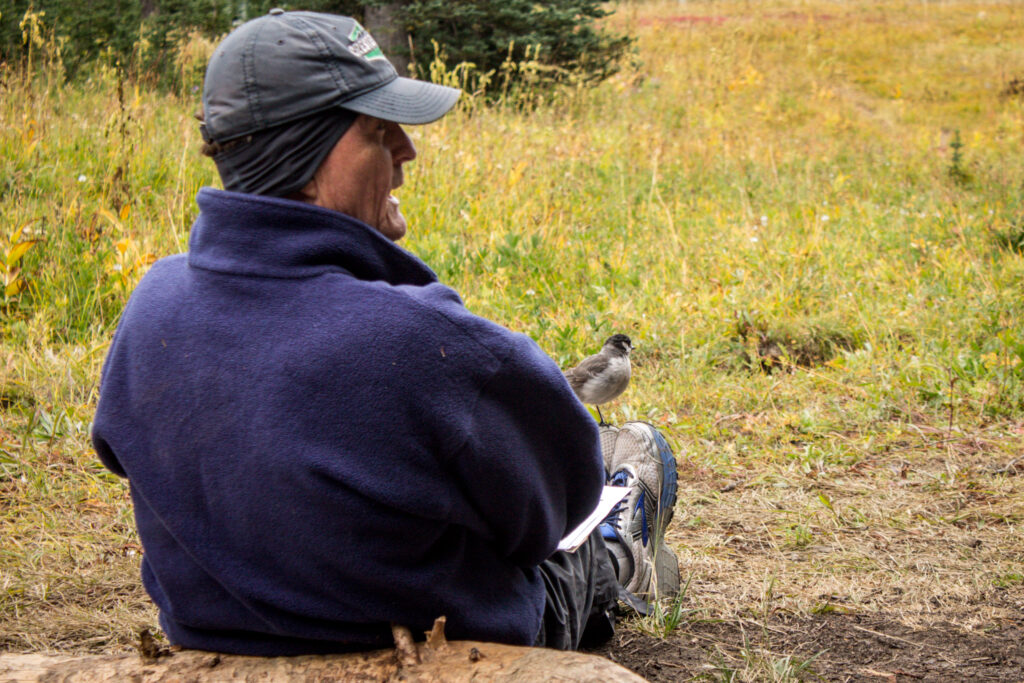
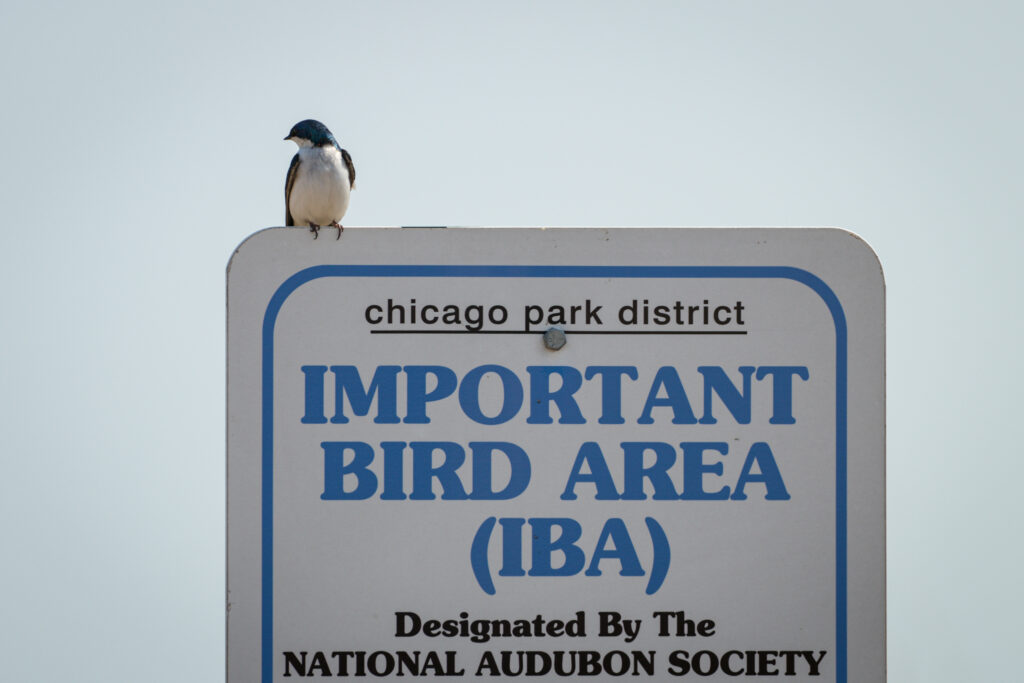
Fun Pic – A Good Bird Photo subcategory is the Fun Pic. As you are out and about birding you see birds doing all kinds of things. They land on a sign, or on someone’s head. They nest in odd places or walk across busy roads without a care in the world. A Fun Pic may not be a great shot of the bird but when you look at it you smile. Or there is something ironic about it. Just remember what Dr. Seuss said when posting these, “It’s fun to have fun but you have to know how!” Here are the kind of Fun Pics that are welcome on the website (you can click on each one and read the description of the shot):
In conclusion a Good Bird Photo is clear enough for a birder to tell what species it is but has one or more technical flaws that reduce its overall quality. Pictures that don’t have technical flaws are either GreatBirdPics or Award Worthy.
Bird Photograph Type 3: GreatBirdPic
From its inception, as rough notes jotted down on the pages of a spiral notebook, this website had a goal – a site that would encourage photographers to show off their best work to bird photography enthusiasts around the world. I dreamed that every image on the site would be an exemplary bird photograph – a Great Bird Pic! How is a GreatBirdPic different from a Good Bird Photo? A GreatBirdPic is in good focus. The lighting is set properly. The bird is well-positioned within the frame. The head and body are relatively unobscured. It may depict some action. It’s interesting to look at. In other words it is good enough to appeal to a broad audience (not just birders) just because its a great photograph.
I often look at one of my pictures ask myself if it is a Good Bird Photo or a GreatBirdPic. To decide, I imagine framing it and giving it to someone as a gift – would they want to hang it on their wall? If not, it’s a Good Bird Photo. If they would like it enough to display in their house it’s a GreatBirdPic. A couple examples of GreatBirdPic quality photographs follow below.
I love pictures with a reflection of the bird in them. This image has a very plain background and no action but the Roseate Spoonbill is in good focus and in an interesting pose. GreatBirdPic quality.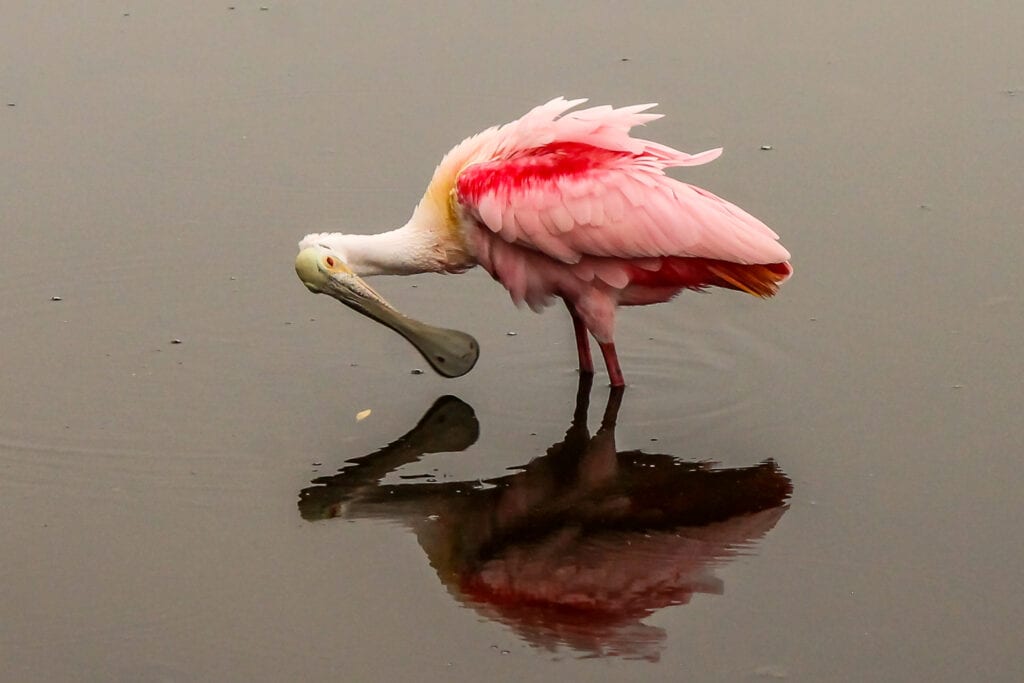
This lovely Vermillion Flycatcher caught the morning sun. No highlights (hot spots). Good focus and detail. The head is angled slightly away from the camera. Definitely a GreatBirdPic.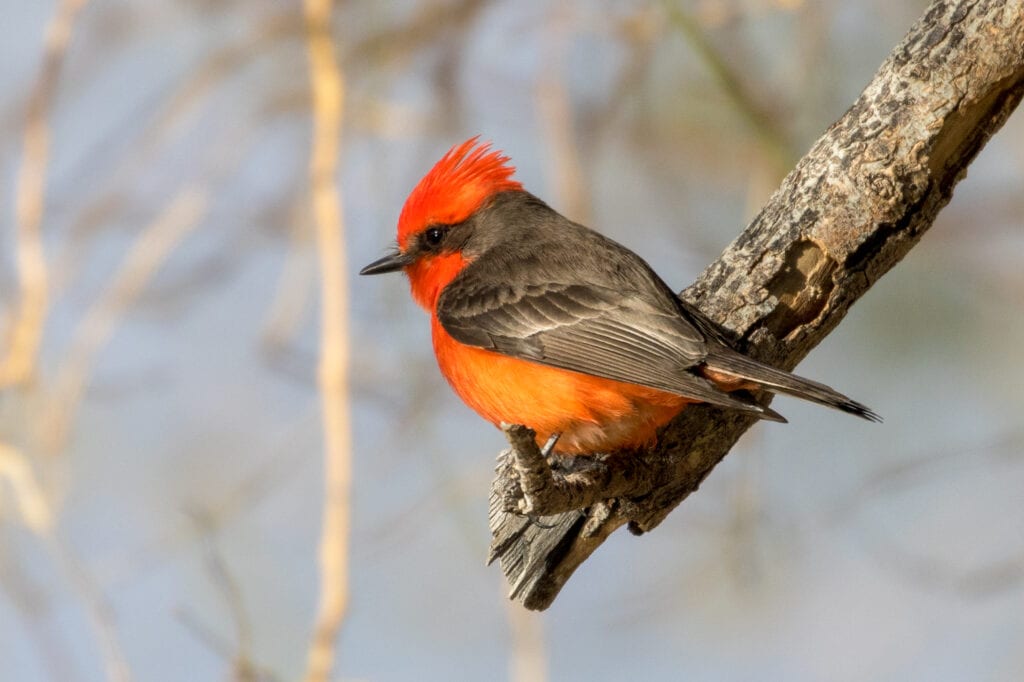
This image of an angry-looking Red-winged Blackbird is very good. The focus is right and the action is interesting. It could have been Award Worthy if it didn’t include a couple of distractions (sticks over the tail) and had more detail under the wings. Still, it’s a GreatBirdPic.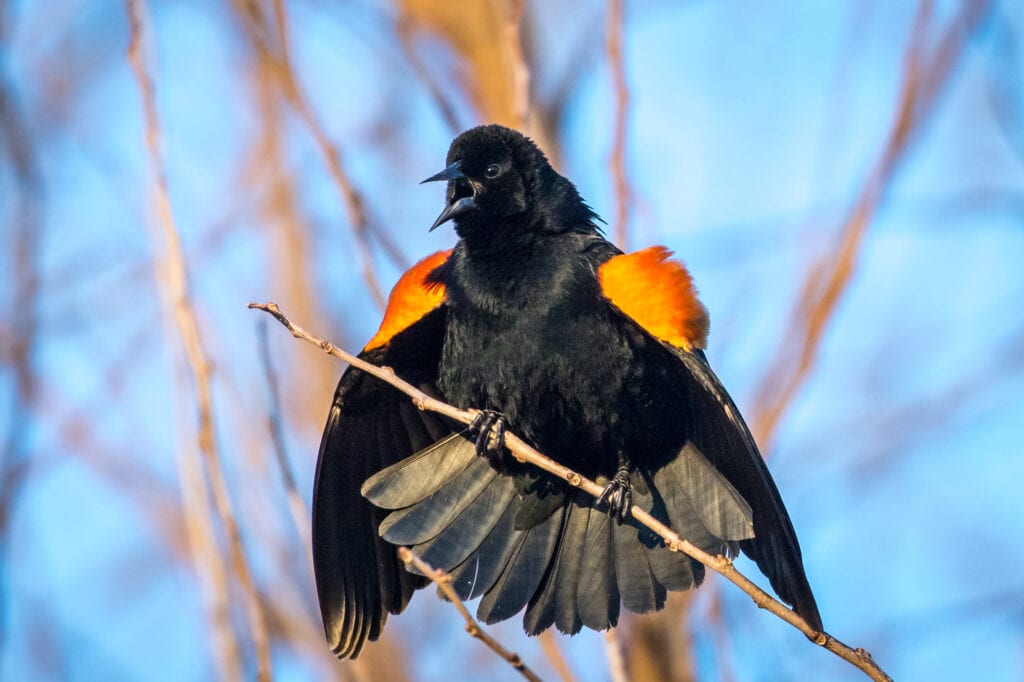
We will learn more about what makes a GreatBirdPic quality photograph when we look at the individual components of the QSAR. Our last, and highest quality of bird photograph, is the Award Worthy type.
Bird Photograph Type 4: Award Worthy
The highest quality bird photograph on the QSAR range is Award Worthy. As the name implies, these pictures are so good they could be entered in a photography contest. We don’t have contests on GreatBirdPics.com but there are lots of on-line photography contests out there. Of the tens-of-thousands of bird pictures I’ve taken only a handful of them would be considered Award Worthy (truth-in-telling – I’ve only entered a couple of photography contests).
What makes a picture Award Worthy? Of course the image has to be in excellent focus. The composition draws your eyes to it. The scene depicted is original – one you’ve rarely seen before. As you look at all the elements of the picture it tells a story about the bird, or it is so beautiful a viewer will involuntarily gasp, “Wow!” It’s just that good. Below are a few Award Worthy photographs.
My photograph of a Tricolored Heron coming in for a landing has a lot going on to invite the viewer to look closely. The ripples of the water when it first touched the surface, the bird as it is about the set down, and the reflection of the heron all tell a story. It is in good focus and the composition is great. Award Worthy!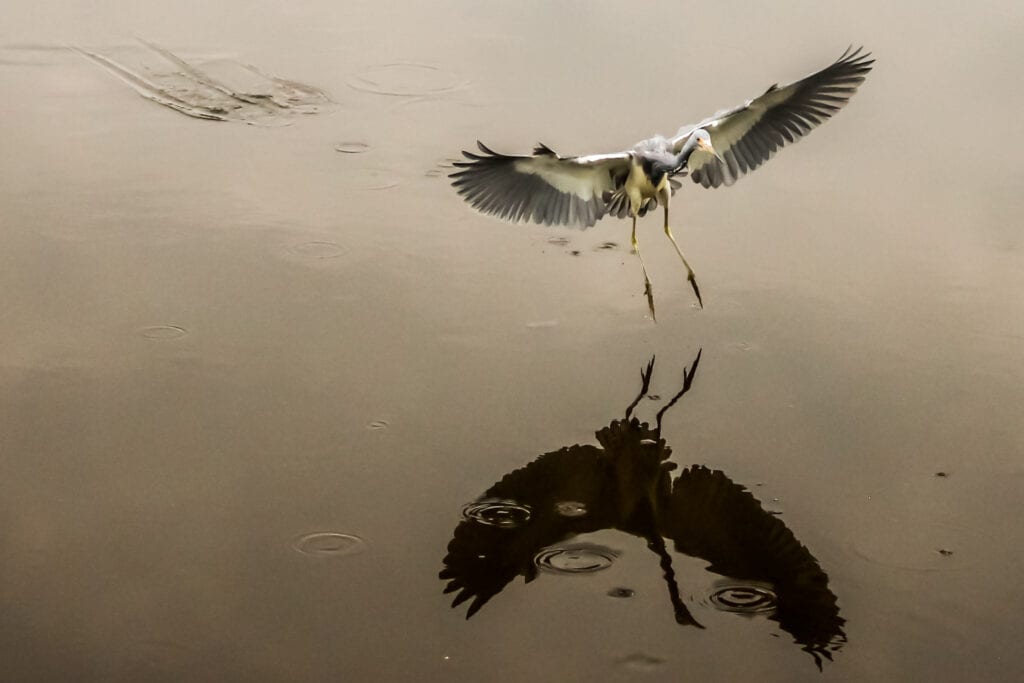
This next Award Worthy photograph was recently posted by member Emil Baumbach. The subject is common – a Great Blue Heron – but the composition, light and colors are outstanding. 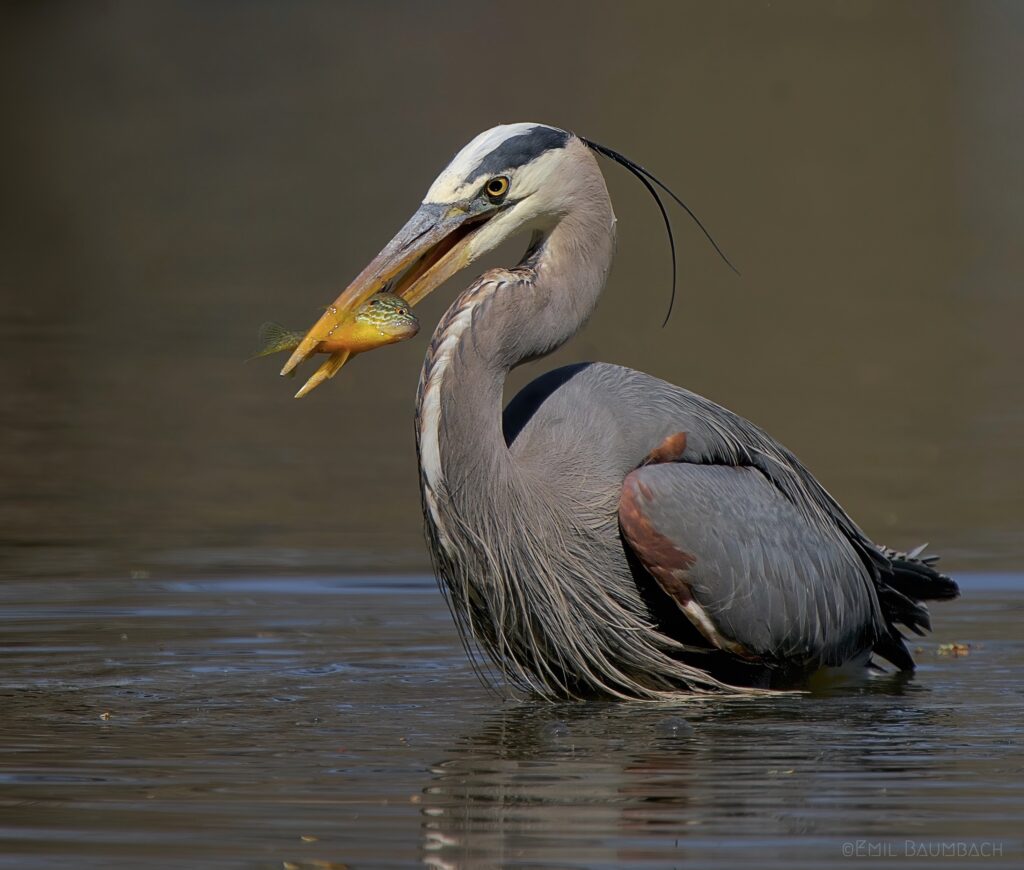
Our last example of an Award Worthy photograph is by Bajadreamer, who captured a Hooded Merganser shouting out. Perfect placement of the bird, the colors are all beautiful, the action is evident. It makes us wonder, “Why is he calling?”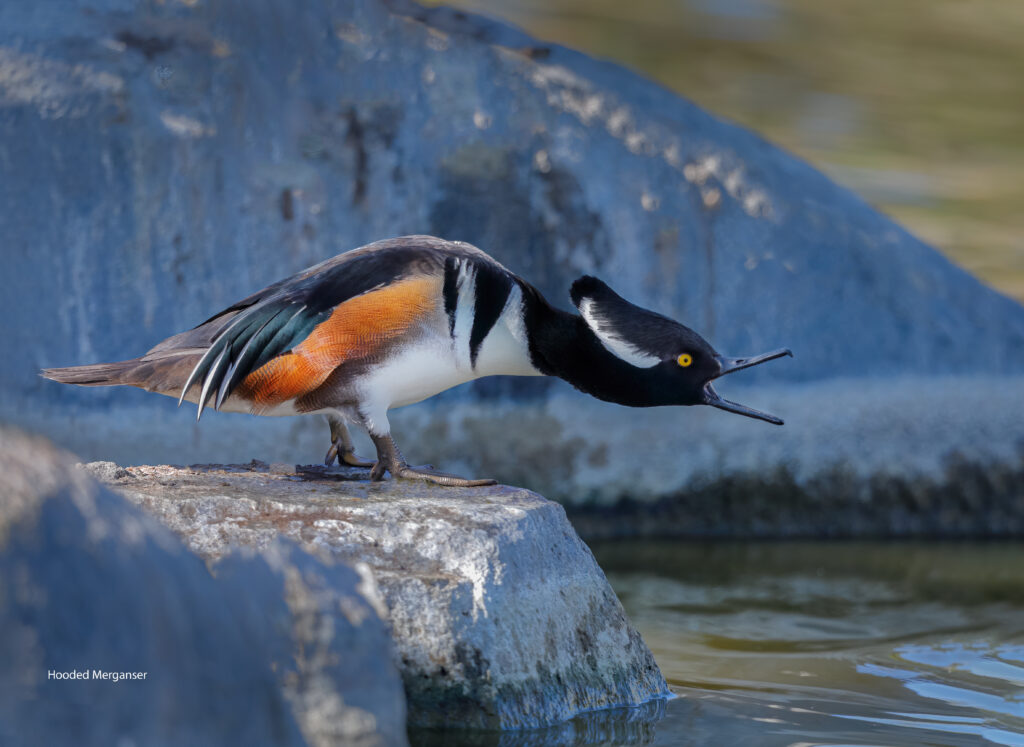
In summary GreatBirdPics.com wants its members to share their best photographs. Documenting Shots are allowable if they have an interesting story included in the Description. Good Bird Photos, particularly of a new species to our site or ones that capture an interesting pose or action, are welcome. Fun Pics are allowed, too! GreatBirdPics are always welcome. We hope to see more Award Worthy images as our members use the QSAR as a guide to improvement. Next we delve into the three Image Characteristics of every photograph.
Introducing the Three Image Characteristics of the Quality Self-Assessment Rubric (QSAR) for Bird Photographs
Acknowledging that “Great” is in the eye of the beholder, every bird photograph exhibits several Image Characteristics that determine its overall quality. QSAR identifies the following three Image Characteristics:
- Technical Quality
- Content
- Artistic Quality
QSAR breaks down each Image Characteristic into 1-5 Components, which are mapped to the Four Types of Bird Photograph previously described using Levels of Quality. Let’s take a brief look at each Image Characteristic and their Components. Each will be fully explained and illustrated.
The Technical Quality Image Characteristic
The Technical Quality of a photograph is the first and perhaps most important of the three Image Characteristics. The Technical Quality of a photograph can be broken down into the following Components:
1. Focus – The focus on the bird takes place in the field – there is not much that can be done to correct it during post-processing. The better the focus, the better the image is in the eye of the viewer.
2. Exposure – This refers to the entire photograph. In some pictures taken while pointed up at a flying bird, the whole frame may be too light (over-exposed). Other pictures taken in deep shade on a cloudy day may look dark (under-exposed).
3. Lighting – Different from Exposure, Lighting refers to the amount of light on the bird itself. When taking a picture of a dark bird that is backlit it may appear too dark while the rest of the image is properly exposed. Similarly when taking a picture of a white bird the bird’s brightness may cause blowout (so bright that it obscures details) on the bird while the rest of the scene appears properly lit.
4. Color Contrast – Cameras today do a pretty good job of recording the colors of the subject properly. Where some get into trouble is back in the “studio” by bumping up the Photo Editor’s Saturation or Vibrance too much. The colors “pop” out, but may actually look unnatural if overdone.
5. Technical Flaws – Most technical flaws are produced by a dirty lens or camera sensor. Bits of dust can show up in an image as dark dots on light areas, like the sky. If the camera had been pointed toward the sun there might be lens reflection flashes on the image.
The Content Image Characteristic
An image’s content begins in the field and can sometimes be adjusted back in the “studio.” The content of a photograph draws our eyes into the scene. Content has five Components:
6. Cropping – When working with the image on their computer, the bird photographer can reduce the amount of space the frame displays or even change the shape of the frame.
7. Composition – If an image is cropped it gives the bird photographer the opportunity to reposition the bird within the frame to create a pleasing composition. Many photographers use the Rule-of-Thirds to position the bird where it makes the most impact on the viewer.
8. Head Position – Being able to clearly see the head of the bird is extremely important. Aside from the field marks that may be present, if the bird’s head is facing the camera the image is so much more interesting than if the head is facing away.
9. Body Visibility – There are many ways in which the head and body of a bird can be obscured: a leaf or a branch, a swell of water in front of a floating bird, or a part of another bird in the way. The more of the body, and the head in particular, that is visible the better the image.
10. Setting – This is where the bird is photographed. Usually we think of birds as being in the wild, but some bird photographs are taken where we live, work, and play. I must admit up front that the quality rankings for Setting are rather subjective on my part. I value a picture of a bird taken in the wild (particularly after a valiant search) more than one of the same bird sitting at a bird feeder in my back yard. This is not to say that pictures of birds at bird feeders, or siting on a piece of rebar at a construction site can’t be beautiful, it’s just that I associate birds with the great outdoors; I rate bird photographs taken in a natural setting higher than those that include “the hand of man.” Extending that thought, the setting of the photograph may show the bird in its habitat or how it fits within the environment – these photographs will rate higher.
Image Characteristic #3 – Artistic Quality
Sometimes we don’t think of bird photographs as being artistic – until we see a really great one. Most of the artistry takes place in the field, where the bird photographer sets up to capture the bird at just the right moment – is the bird looking for a fish or has it just grabbed one? Is the bird perched on a branch or is it reaching for a colorful berry? The artistry comes the moment the image is captured; it has three Components:
11. Originality – Is the final product just like hundreds of other pictures of that species (i.e. a Great Blue Heron standing in water) or is it something rarely seen before? Patience for the bird photographer is a key trait in order to get original shots.
12. The Story Within the Photograph – It’s fair to say that every bird photograph tells a story, it’s just that some of those stories are so much more interesting than others. A picture of a warbler perched on a branch isn’t as interesting as a picture of one with a dragonfly in their beak. Not all bird pictures tell a good story, but the ones that do are most welcome on GreatBirdPics.com!
13. Impact – What does the viewer feel when looking at the image? Is it, “Ho-hum, another picture of an eagle” or is it, “Wow! Look at the talons on the eagle as it’s about to grab that fish!”
Follows the Rules (of GreatBirdPics or Bird Photography Contest)
The QSAR includes one more section that is not related to photographic quality but to GreatBirdPics.com‘s rules that govern what can and cannot be posted. These same rules are usually applied in bird photography contests. Follows the Rules contains two Components:
14. Ethical Rules – GreatBirdPics.com does not accept pictures of dead birds. It will also not accept photographs that were taken using unethical or inhumane methods.
15. Technical Rules – These are identified mainly for the benefit of those who are interested in entering their bird photographs in a Photography Contest. These contests may have stringent rules about file size or the degree to which an image can be digitally altered.
Now that we have introduced the QSAR’S Four Types of Bird Photographs and the three Image Characteristics of a bird photograph we will next describe and provide illustrations for each Component. First up Technical Quality. CLICK HERE or use the pull-down QSAR menu above to go that Component (or any of the others).