Setting Up Your Camera For Success: Birds In The Snow
First off a big Happy 91st Birthday Dad! You continue to amaze me!
In the last post I shared some things to keep in mind when doing winter bird photography from the car. Those tips will get you in position to take a shot but if your camera is setup wrong your pictures may end up not looking very good. You must fine-tune two key camera settings to get great pictures of birds in the snow: Exposure Composition (EC for short) and the Metering Mode.
Before we get into EC and the Metering Mode it’s best to understand your camera’s exposure goal when taking any picture. Whenever you aim the camera at something, every camera is designed to set the exposure to produce an image that is a light gray (18%) shade (unless you are in full Manual Mode which overrides all the camera’s decisions). Click HERE if you want to learn why 18% gray is the optimum exposure. If the light the camera sees is brighter than 18% gray the camera automatically adjusts the exposure down (less light) to bring the light in line with what is expected. If what the camera sees is darker than 18% gray, it adjusts to provide additional light. That works for most shots, but when you throw in a bird with a background of snow it becomes problematic.
Metering Mode
Now let’s take a look at your camera’s Metering Mode setting. The Metering Mode tells the camera where to look in order to determine the exposure. Since we are talking about photographing birds in the snow I’ll cut to the chase – use Spot Metering. Spot Metering is the smallest area the camera can look at to determine the exposure. I use Spot Metering for every shot – I want the camera to see only the light on the bird and adjust the exposure accordingly. A landscape photographer shooting a sunrise would use a different Metering Mode because the subject fills the frame. So set your camera to Spot Metering.
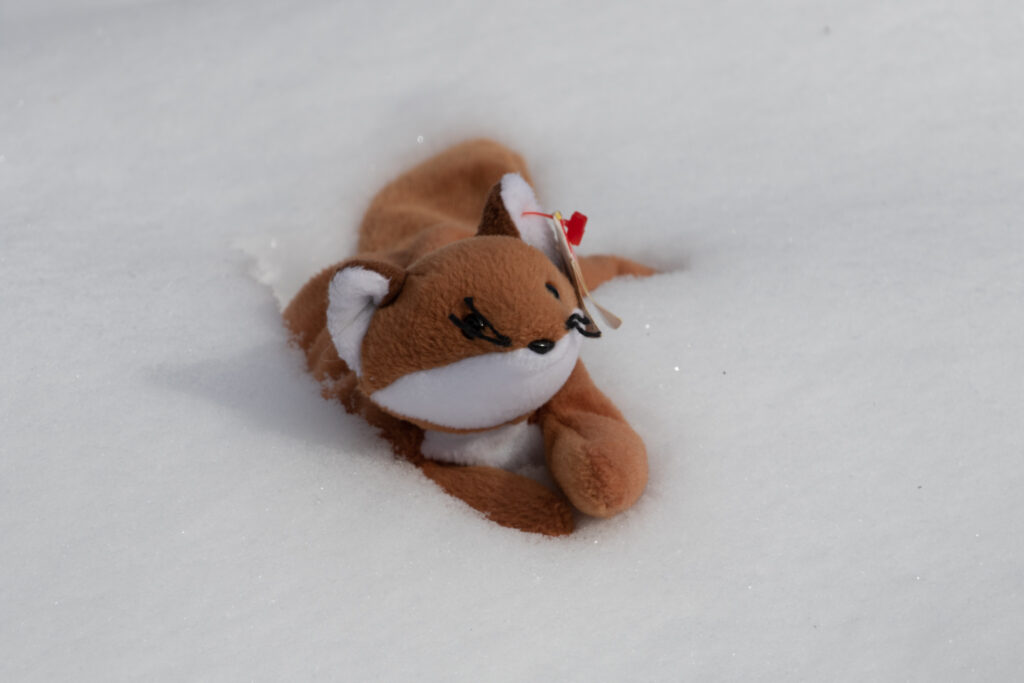
Now let’s apply Spot Metering when photographing a bird in the snow. I grabbed one of son Sean’s old Beanie Babies and placed it in the snow in the back yard. If you look at the first picture below you’ll see that the Beanie Baby takes up about 20% of the frame. The camera, in Spot Metering mode, judged the light on the object as a little bright so the image was underexposed a little. The camera saw some of the bright snow and let in less light. Note you can see the shadow of the Beanie Baby so even though it was bright sunlight, the camera thought it was too much and reduced the light coming in.
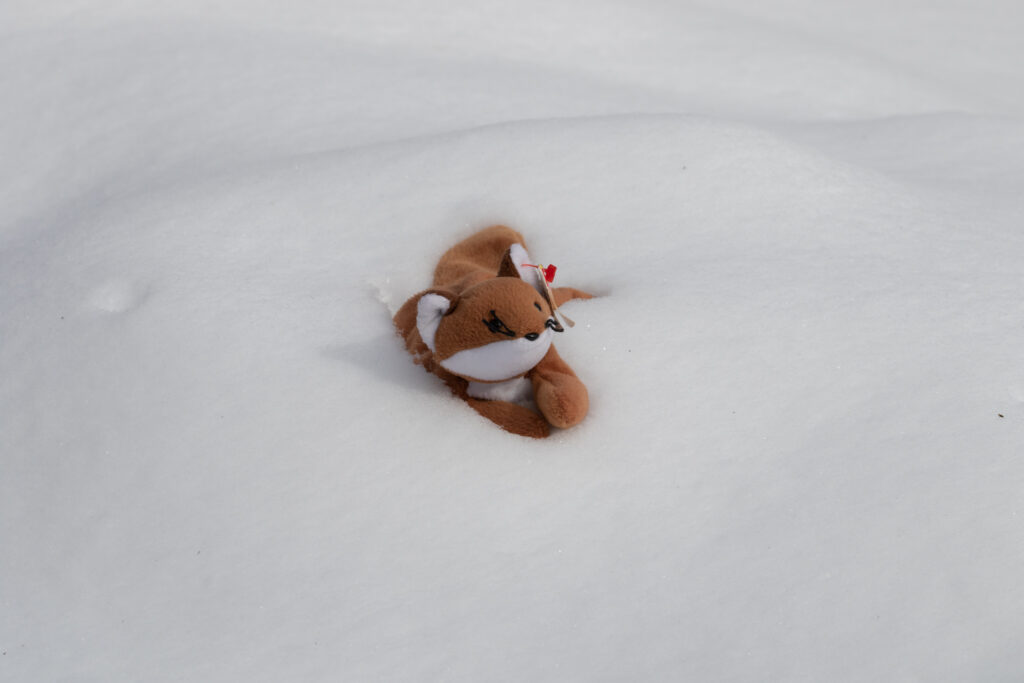
Now let’s look at shot #2. Because the object is smaller, the Spot Metering captured more of the bright snow around it and thought, “This is too bright. I’ll make it darker.” The image has a gray look overall.
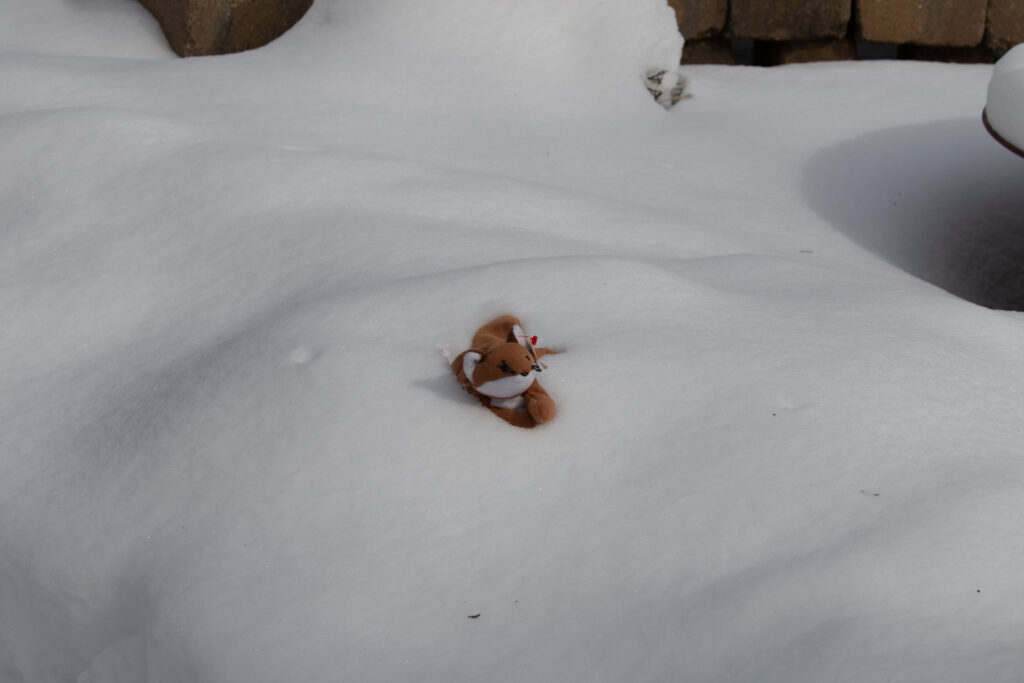
Finally shot #3. The Beanie Baby takes up a small portion of the frame so the Spot Metering captured even more of the white snow; the camera decided to darken the image accordingly. Note that the snow, instead of being that bright white we would expect the snow looks like its that 18% gray tone – just what the camera was designed to do.
All of the above images can be lightened during post-processing but doing so introduces more Noise into the image. imagine that! On a bright sunny day in the snow your pictures could turn out dark and grainy. To prevent this from happening we use Exposure Compensation before taking the shot.
Exposure Compensation
Just about every camera has an Exposure Compensation setting. It usually is displayed as a bar graph (with a + on the right and a – on the left) in the viewfinder or on the back of the camera, along with the other camera settings. There will be an EC menu or a button marked +/- to adjust it. Moving the setting to the + (right) side adds light; moving it to the – (left) side lets less light into the camera. Changing the EC actually changes the shutter speed, aperture and/or ISO to capture the desired amount of light (check these after adjusting the EC to see if they are still within an acceptable range).
To put a finer point on it when there is a bright background like snow you must increase your EC to the + (right) side. In the snow the camera sees so much light it wants to make the exposure darker – increasing the EC tells the camera to let in more light. It sounds contradictory to let in more light when shooting out in the bright snow but what you are doing is overriding the camera’s programming to reduce that brightness.
Exposure Compensation Settings In The Snow
So what do you set your camera’s EC to when shooting birds in the snow? It depends on the amount of sun and where the bird is. The more bright/white snow that appears in your viewfinder, the higher you adjust the EC.
1. If the bird is fairly close (takes up 1/3 or more in the viewfinder) AND on a patch of dark road or grass with a snowy background keep the EC at zero. No harm done if it’s just a little underexposed.
2. If the bird is fairly close (takes up 1/3 or more of the viewfinder) AND has just a snow background set the EC to +1/3 to +2/3.
(For both of the above settings you still may need to increase the exposure during post-processing, but minimally).
3. If the bird is farther away (takes up less than 1/3 of the viewfinder) AND has a snow background on an overcast day set the EC to +1.
4. If the bird is farther away (takes up less than 1/3 of the viewfinder) AND has a snow background in bright sunshine set the EC to +2 (do a quick test shot and check, you may need to go up even higher).
Although it seems backwards, when the bird has a bright background you need to tell the camera to increase the amount of light it allows in. Use Spot Metering, adjust the Exposure Compensation on the + (plus/right) side, and shoot away! Then share your results on GreatBirdPics!
PS – If you would like to learn more about GreatBirdPics click HERE. If you would like to share your beautiful bird images with us become a member HERE and start uploading today!